Distribution Analysis
The optional Distribution Analysis/Distribution analysis-Multi features uses the FX120 to act like an ONT receiver by passively listening to downstream OLT traffic and capturing the ONT’s SSN/PID. The FX120 "To OLT" port connects to the splitter (from the Splitter Analysis step) and the FX120 "To ONT" port connects to the customer‑side distribution ODF ports and listens to the splitter leg feeding each port to verify that every splitter output is correctly mapped to the intended customer port and that end‑to‑end connectivity is intact.
The Distribution Analysis is used for:
-
Cabinet Audits: Ensures that each customer port on the ODF is correctly mapped to the intended splitter port. Tailors the analysis to the specific cabinet layout (panel type profiles).
-
Service Activation: Verifies that the ONT is connected to the correct splitter leg before provisioning.
-
Troubleshooting: Identifies mismatches, swapped fibers, or inactive ports that could cause service issues. Displays text indicators to show if a signal is detected (with SSN/PID captured), no signal, or empty port. These status labels help technicians instantly identify issues.
Passive listening avoids interrupting live traffic. (Pass-through PON meter)
-
Documentation Sync: Helps reconcile field connections with network records, reducing provisioning errors. Provides unique ONT identifiers (SSN/PID) for precise mapping.
Process
The patchcord connected between the FX120 "To OLT" port and the splitter should remain after scanning splitter ports. Use another patchcord to connect the FX120 "To ONT" port and the ODF (Distribution frame) port(s). The test set listens to see if there is a live signal (capturing the SSN/PID), no signal, or empty port from the ODF to the expected splitter assignment. Any discrepancies are flagged due to undocumented changes, such as a port reassigned or incorrectly patched.
Using the Advanced Distribution Analysis/Distribution Analysis-Multi feature
Before starting the Distribution Analysis on the test set, keep the connection from the FX120 To OLT port to the Splitter (any free port) and connect another patchcord from the FX120 To ONT port to the customer port on the ODF by swapping out the customer patchcord.
-
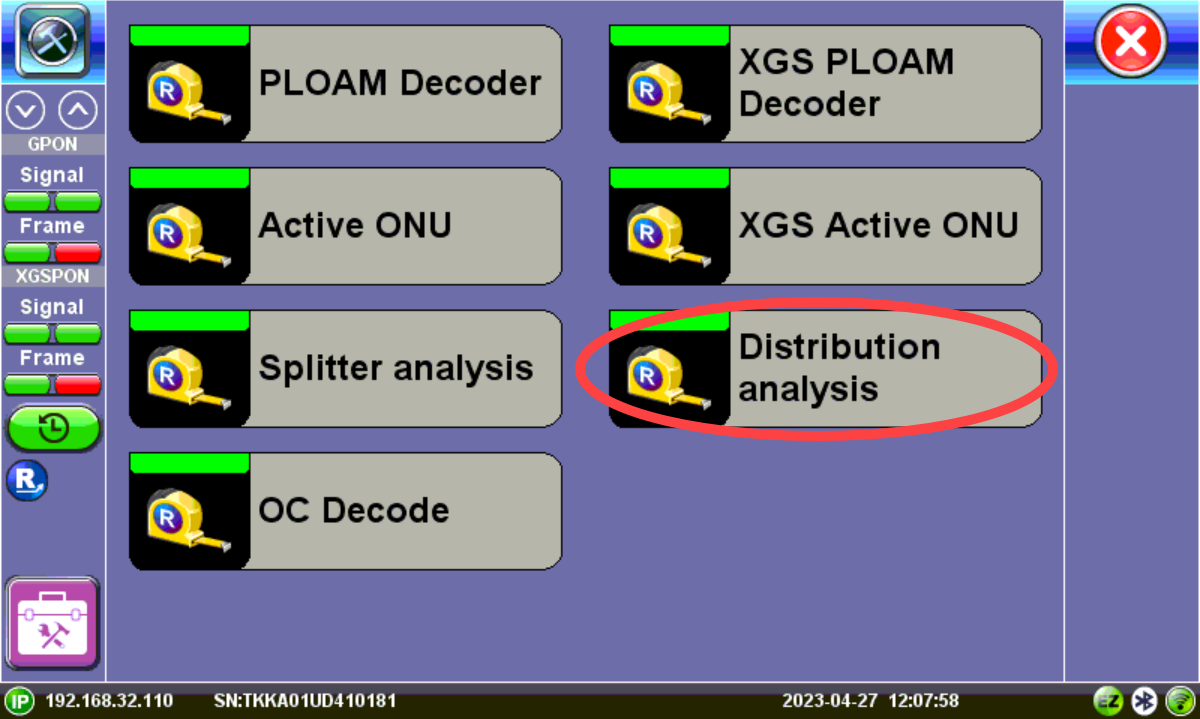
On the FX120, press Tools to access the Advanced menu, and then press Distribution analysis or Distribution analysis-Multi (will show Next SP button to move to next splitter).
-
After entering a location, select the Panel Type profile being audited.
 If the Panel Type being audited is not listed, speak to your regional sales team about importing a custom profile before beginning the auditing process.
 -
If needed, press Setup to select the Fault Locator option. Refer to Automatic Fault Locator.
-
On the FX120, press Start.
-
Select a color for the cable connected to the port. The port color will be reflected on the table. Skipped ports will not require a color selection on subsequent passes.
-
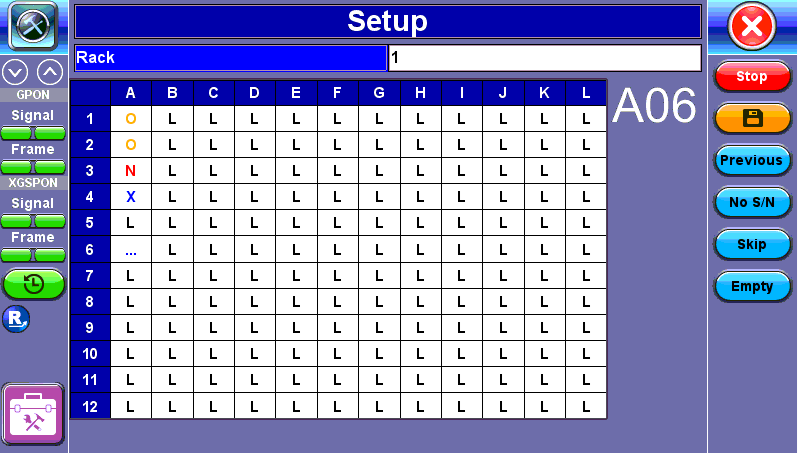
On the ODF, beginning at position A01, swap out the customer ONT patchcord with your FX120 ONT patchcord. The FX120 will listen for a re-establishment of connection from the OLT to the ONT. While the connection is under test three dots
 are displayed.
 Do not disconnect the FX120 OLT patchcord at any time so each port signal can be continuously scanned during the audit process. Disconnecting the customer ONT patchcord will briefly disrupt the customer connection.
-
Wait until a letter is displayed, then disconnect the FX120 ONT patchcord from the customer port, reconnect the customer patchcord, and move the patchcord to the next customer port on the ODF. If the port has an ONT connected, it will mark the port as "O" with the SN. If the port is empty, mark it ”Empty” until the next occupied port is reached. If the port has a patchcord but no letter, mark the port as "No SN" or "Skip".The FX120 will listen to and collect information associated with that port. It may take up to ten seconds for the OLT/ONT to restart the connection and the FX120 to detect the information exchanged between them.
Check all positions to avoid incorrect information being captured. -
If using the Distribution Analysis - Multi feature, press Next SP to move to the next splitter and continue steps 5 -8. If needed press Save to create a restore point.
-
After the scan is complete, press the Save button to generate a CSV file containing the information collected from the port scanning process, including Rack, Position (Port), Cable Color, SSN (if captured), Level, and/or PON ID (if captured). This file can be used to compare to the PON network database. See Working with Saved Results, Profiles, Images for details on exporting the CSV file.
At any point during the test, a restore point can be set by pressing the orange Save button. The analysis can then be resumed from the point at which it was saved. In the event of low battery or reboot, the unit will automatically create a restore point in which the analysis may be resumed as long as the location and panel type match.
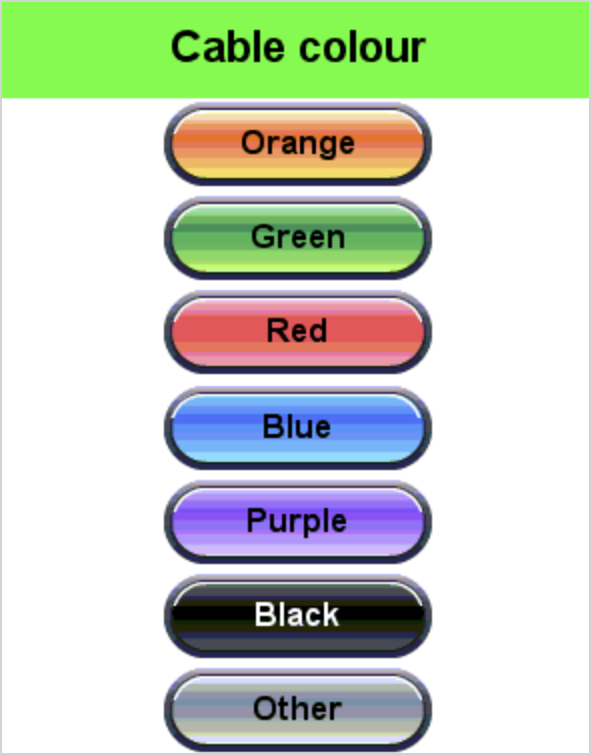
The unit performs a precheck to ensure the setup is correct and the analyzer is receiving valid downstream OLT traffic from the splitter. The technology mode (GPON/XGS-PON/EPON/10G EPON) is detected automatically. Subsequent passes may be needed for EPON/10G EPON OLTs.
Distribution Analysis
The test set will beep when action is needed, such as when:
-
A colour selection is required.
-
Multiple ONUs are detected.
-
LOS is detected.
| Description | Action |
| To re-test the previous port |
Press Previous to go back one port at a time. If multiple ports are skipped back, the scan process restarts from that point.
|
| To jump to the next splitter bank (in splitter analysis) |
Press Next Split. The unit will mark all skipped positions in the current splitter bank L (empty) automatically and move to the next splitter bank.
|
|
To jump to the next port (in distribution analysis e.g. belongs to another operator) |
Press Skip. The unit will move to the next port automatically. |
| If no SSN (ONU) is detected |
Press No S/N. |
|
If there is no patch cord connected |
Press Empty. |
| To stop analysis |
Press Stop. All ports not analyzed will be marked Empty ("L") automatically. |
|
To manually create a restore point |
Press the orange "Save" button. The analysis can then be resumed from the point at which it was saved. In the event of low battery or reboot, the unit will automatically create a restore point in which the analysis may be resumed, as long as the location and panel type match. |
|
To save results to a CSV file |
Press Stop to end the test, then OK at the prompt. This file can be used to compare to the PON network database. |
| Port Position Indicator | Meaning | Action |
| ... | The FX120 is waiting to detect a change in the received signal for that position. | Disconnect and reconnect the patchcord from the port position on the ODP panel after 1-2 seconds. It may take up to ten seconds for the OLT/ONT to restart the connection and the FX120 to detect the information exchanged between them. |
| O | The SSN Serial Number and/or PON-ID has been captured. | No action needed. The unit will move to the next port automatically. Duplicate SSN Serial Numbers will be ignored. |
| N | No SSN Serial Number was detected. | After a few seconds, press No S/N. The unit will then move to the next port automatically. |
| L | Empty port. This could be the default or manually set. When scanning ports for the first time, all positions are L by default because the unit assumes they are all empty. | Press Empty. The unit will then move to the next port automatically. |
| X | Skipped port | If needed, skip a port and recheck later, so no misinformation is collected. |
|
|
 The test set detects the technology mode (GPON/XGS-PON) and the distribution analysis plugs into a single OLT port for the duration of the analysis. If auditing a GPON-only and XGS-PON-only panel, make sure the OLT port is connected to an OLT capable of both GPON and XGS-PON or run the analysis twice, once connected to a GPON OLT and again to the XGS-PON OLT.
Automatic Fault Locator
The Fault Locator option measures the length of the cable (or up to the first event) that is currently connected during the analysis test and detects if an ONT is at the fiber end. It ensures cable length is correct for fibers with a measuring range between 10 m to 20 km. If there is an ONT at the fiber end, it will be detected automatically. It can also be used to troubleshoot analysis results that aren't expected such as when no serial number is detected.
To access Fault Locator options, select Tools > Distribution Analysis > Setup.
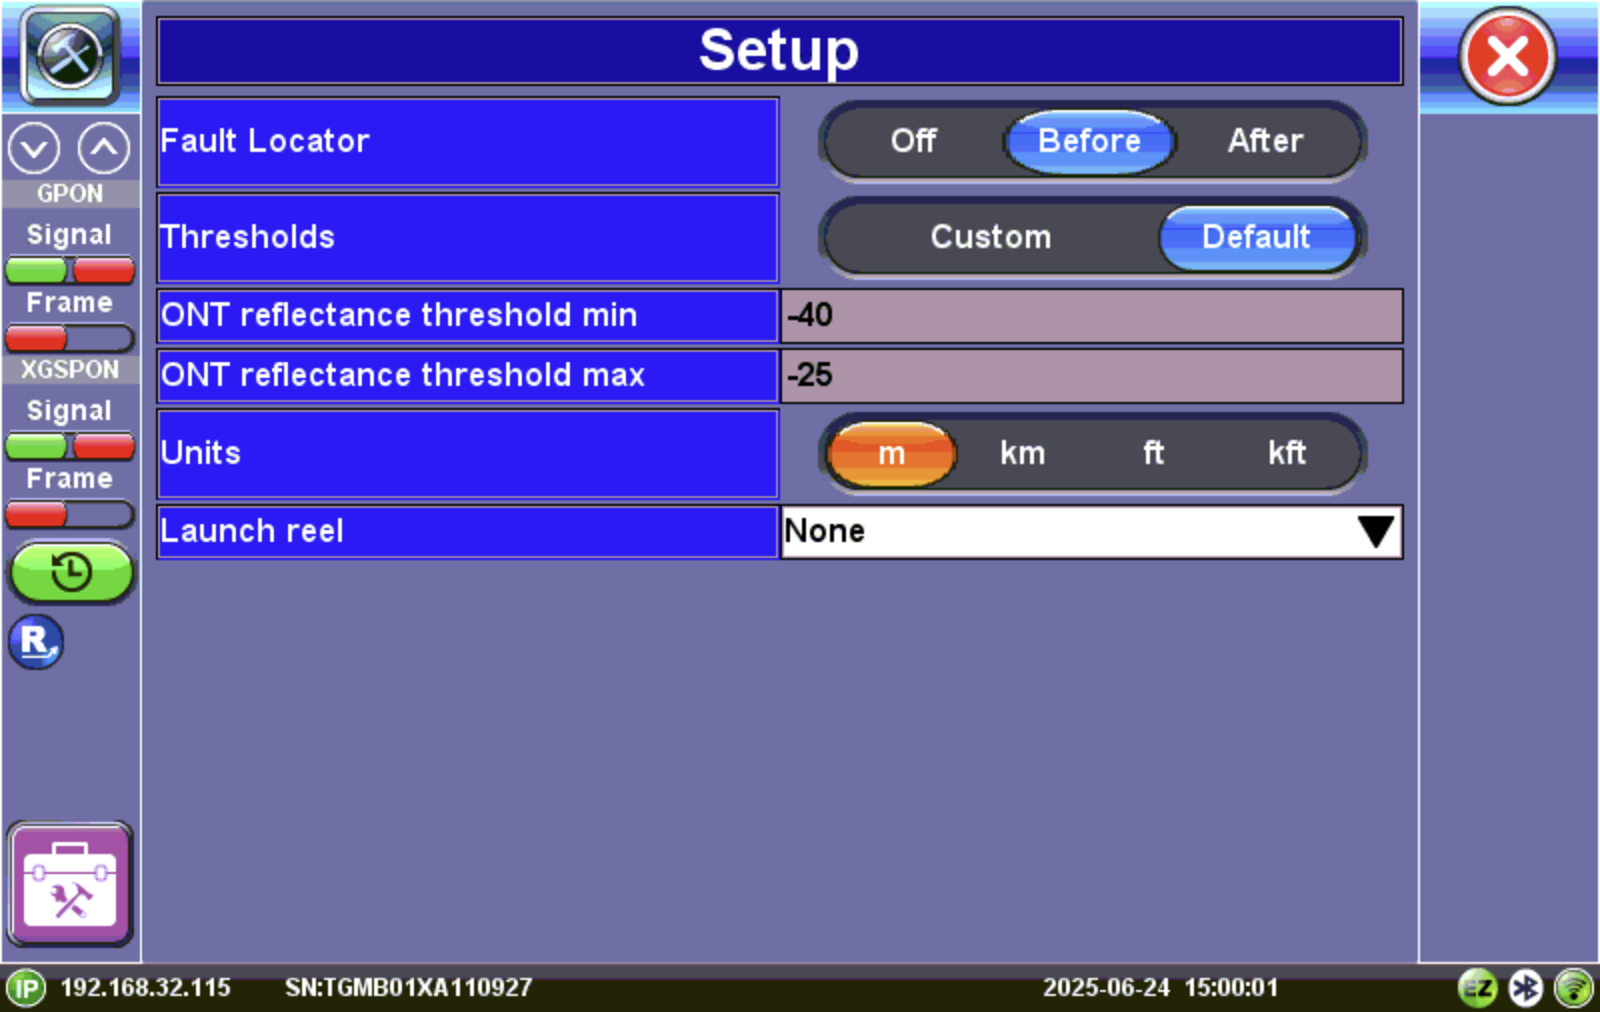
Fault Locator Options - Before Analysis
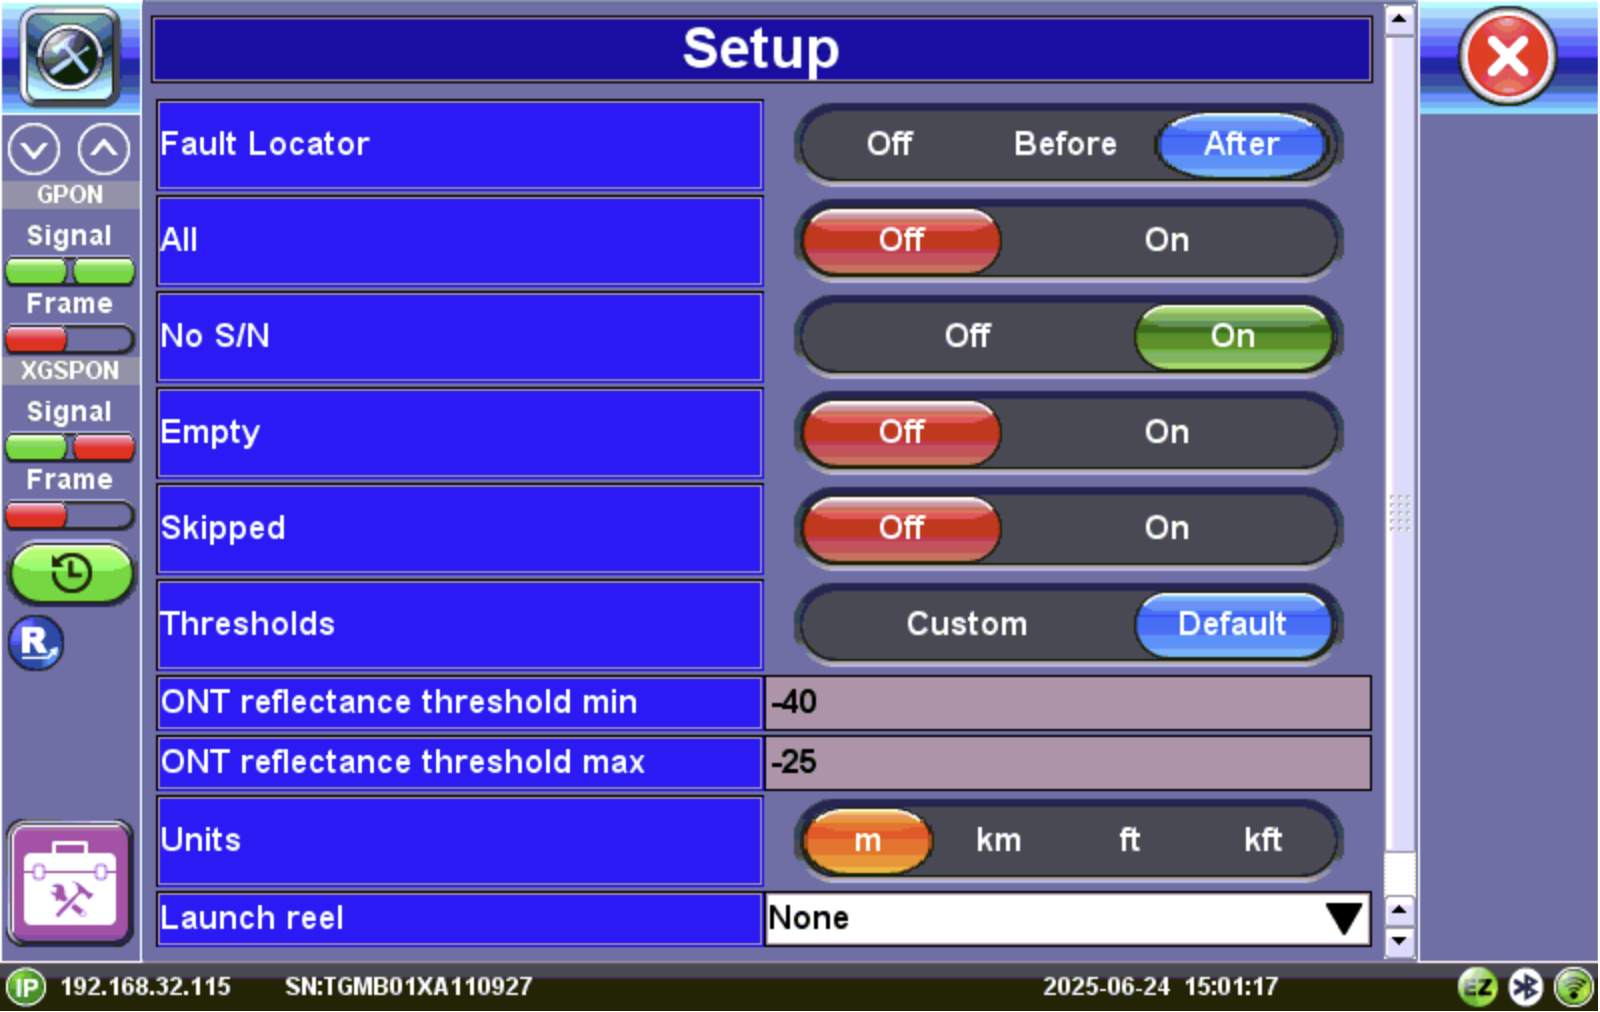
Fault Locator Options - After Analysis
-
OFF -- Don't measure.
-
BEFORE -- Once a fiber is connected and the test is started, the test set runs a fault locator test (measures distance) on each and every single fiber before configuring the table and performing the analysis test.
-
AFTER -- The test set measures the fiber distance automatically for selected results (No S/N, Empty, Skipped) after completing the analysis . If doing a multi-splitter audit, the fiber distance is measured for selected results after the last splitter. For example, if No S/N (no serial number) is selected, the fault locator test is performed automatically on the No S/N result to search for an ONT at the end. It detects the ONT based on reflectance thresholds entered. If an ONT is detected, then further troubleshooting of the no serial number result is needed.
-
ONT Thresholds - default or custom
-
Units - Select the unit of measurement.
-
Launch reel - If using a launch fiber, select the length from the Launch Reel drop-down.
Select the Fault Locator options, then run the Distribution Analysis. The analyzer will measure power levels and automatically run the fault locator based on your settings. The analysis test results will include the fiber length measurement. If Launch reel is enabled, the total length will reflect that.
Troubleshoot LOF
If a "LOF detected" message is displayed, this means the receiver is not syncing and no valid GPON/XGS-PON/EPON frames are detected. To troubleshoot:
-
Check Downstream Power - If power is low or unstable, clean and reseat the connector and try again.
-
Confirm Correct Splitter Leg - LOF is common on dark/unused legs. Compare ODN class and expected attenuation.
-
Inspect Connectors and Splices - Clean connectors and look for high-loss splices, bends, or damaged jumpers.
-
Look for Reflections - Check for open connectors, bad APC angles, loose adapters.
-
Check OLT Status - Feeder may be dark or port disabled. If multiple legs show LOF with good power, suspect the OLT.
-
Compare to a known good port - Confirms the analyzer is functioning and isolates ODN issues.
-
Validate the ODN Loss Budget - Excessive attenuation means LOF is expected.