V-TEST
The V-TEST feature qualifies network TCP/HTTP protocol performance by testing Internet speeds up to a full line rate against a server to verify the maximum download and upload data rates attainable by subscribers' high-speed or Gigabit Internet services.
Basic V-TEST
When the MTX150x Lite is powered on the test set automatically loads the V-TEST (VeEX Internet Speed Test) application using nearby Ookla servers as the default.
Run a Speed Test
Press and hold the Power button ![]() for two seconds, until a confirmation tone (beep) is heard, and the VeEX logo appears on the screen, then release the power button.
for two seconds, until a confirmation tone (beep) is heard, and the VeEX logo appears on the screen, then release the power button.
The test set will take a few seconds to
Once ready, the Basic V-TEST screen displays with a GO button![]() in the center. This indicates that the test set is ready to test.
in the center. This indicates that the test set is ready to test.
![]() To turn the test set OFF, press and hold the Power button
To turn the test set OFF, press and hold the Power button ![]() until two confirmation tones (beeps) are heard.
until two confirmation tones (beeps) are heard.
![]() By default, the test set always starts in BASE-T copper mode
By default, the test set always starts in BASE-T copper mode ![]() , as indicated by the Test Mode Selection button. It can detect 10GBASE-T, 5GBASE-T, 2.5GBASE-T, 1000BASE-T and even legacy 10/100BASE-T automatically.
, as indicated by the Test Mode Selection button. It can detect 10GBASE-T, 5GBASE-T, 2.5GBASE-T, 1000BASE-T and even legacy 10/100BASE-T automatically.
Changing Test Modes (Copper ↔ Fiber)
By default, the test set starts in copper (RJ45) mode and it can detect 10GBASE-T, 5GBASE-T, 2.5GBASE-T, 1000BASE-T and even legacy 10/100BASE-T automatically.
Changing Test Modes
To change between fiber optics and copper test modes:
-
Tap
 , then tap Test Mode button at the bottom left of the screen to access the Layer4 Test Mode Selection menu.
 -
For Fiber Optics, tap
 and for Copper, tap
  , then select the checkbox for the appropriate test mode: 1GE (1000M BASE-X) or 10GE or 1000M/2.5G/5G/10G BASE-T
 -
Press OK and wait for the test application to load.
-
Connect the test cable between the test set and the device under test, then select Speed Test from the menu and run the test.
Press ![]() to run the Internet speed test.
to run the Internet speed test.
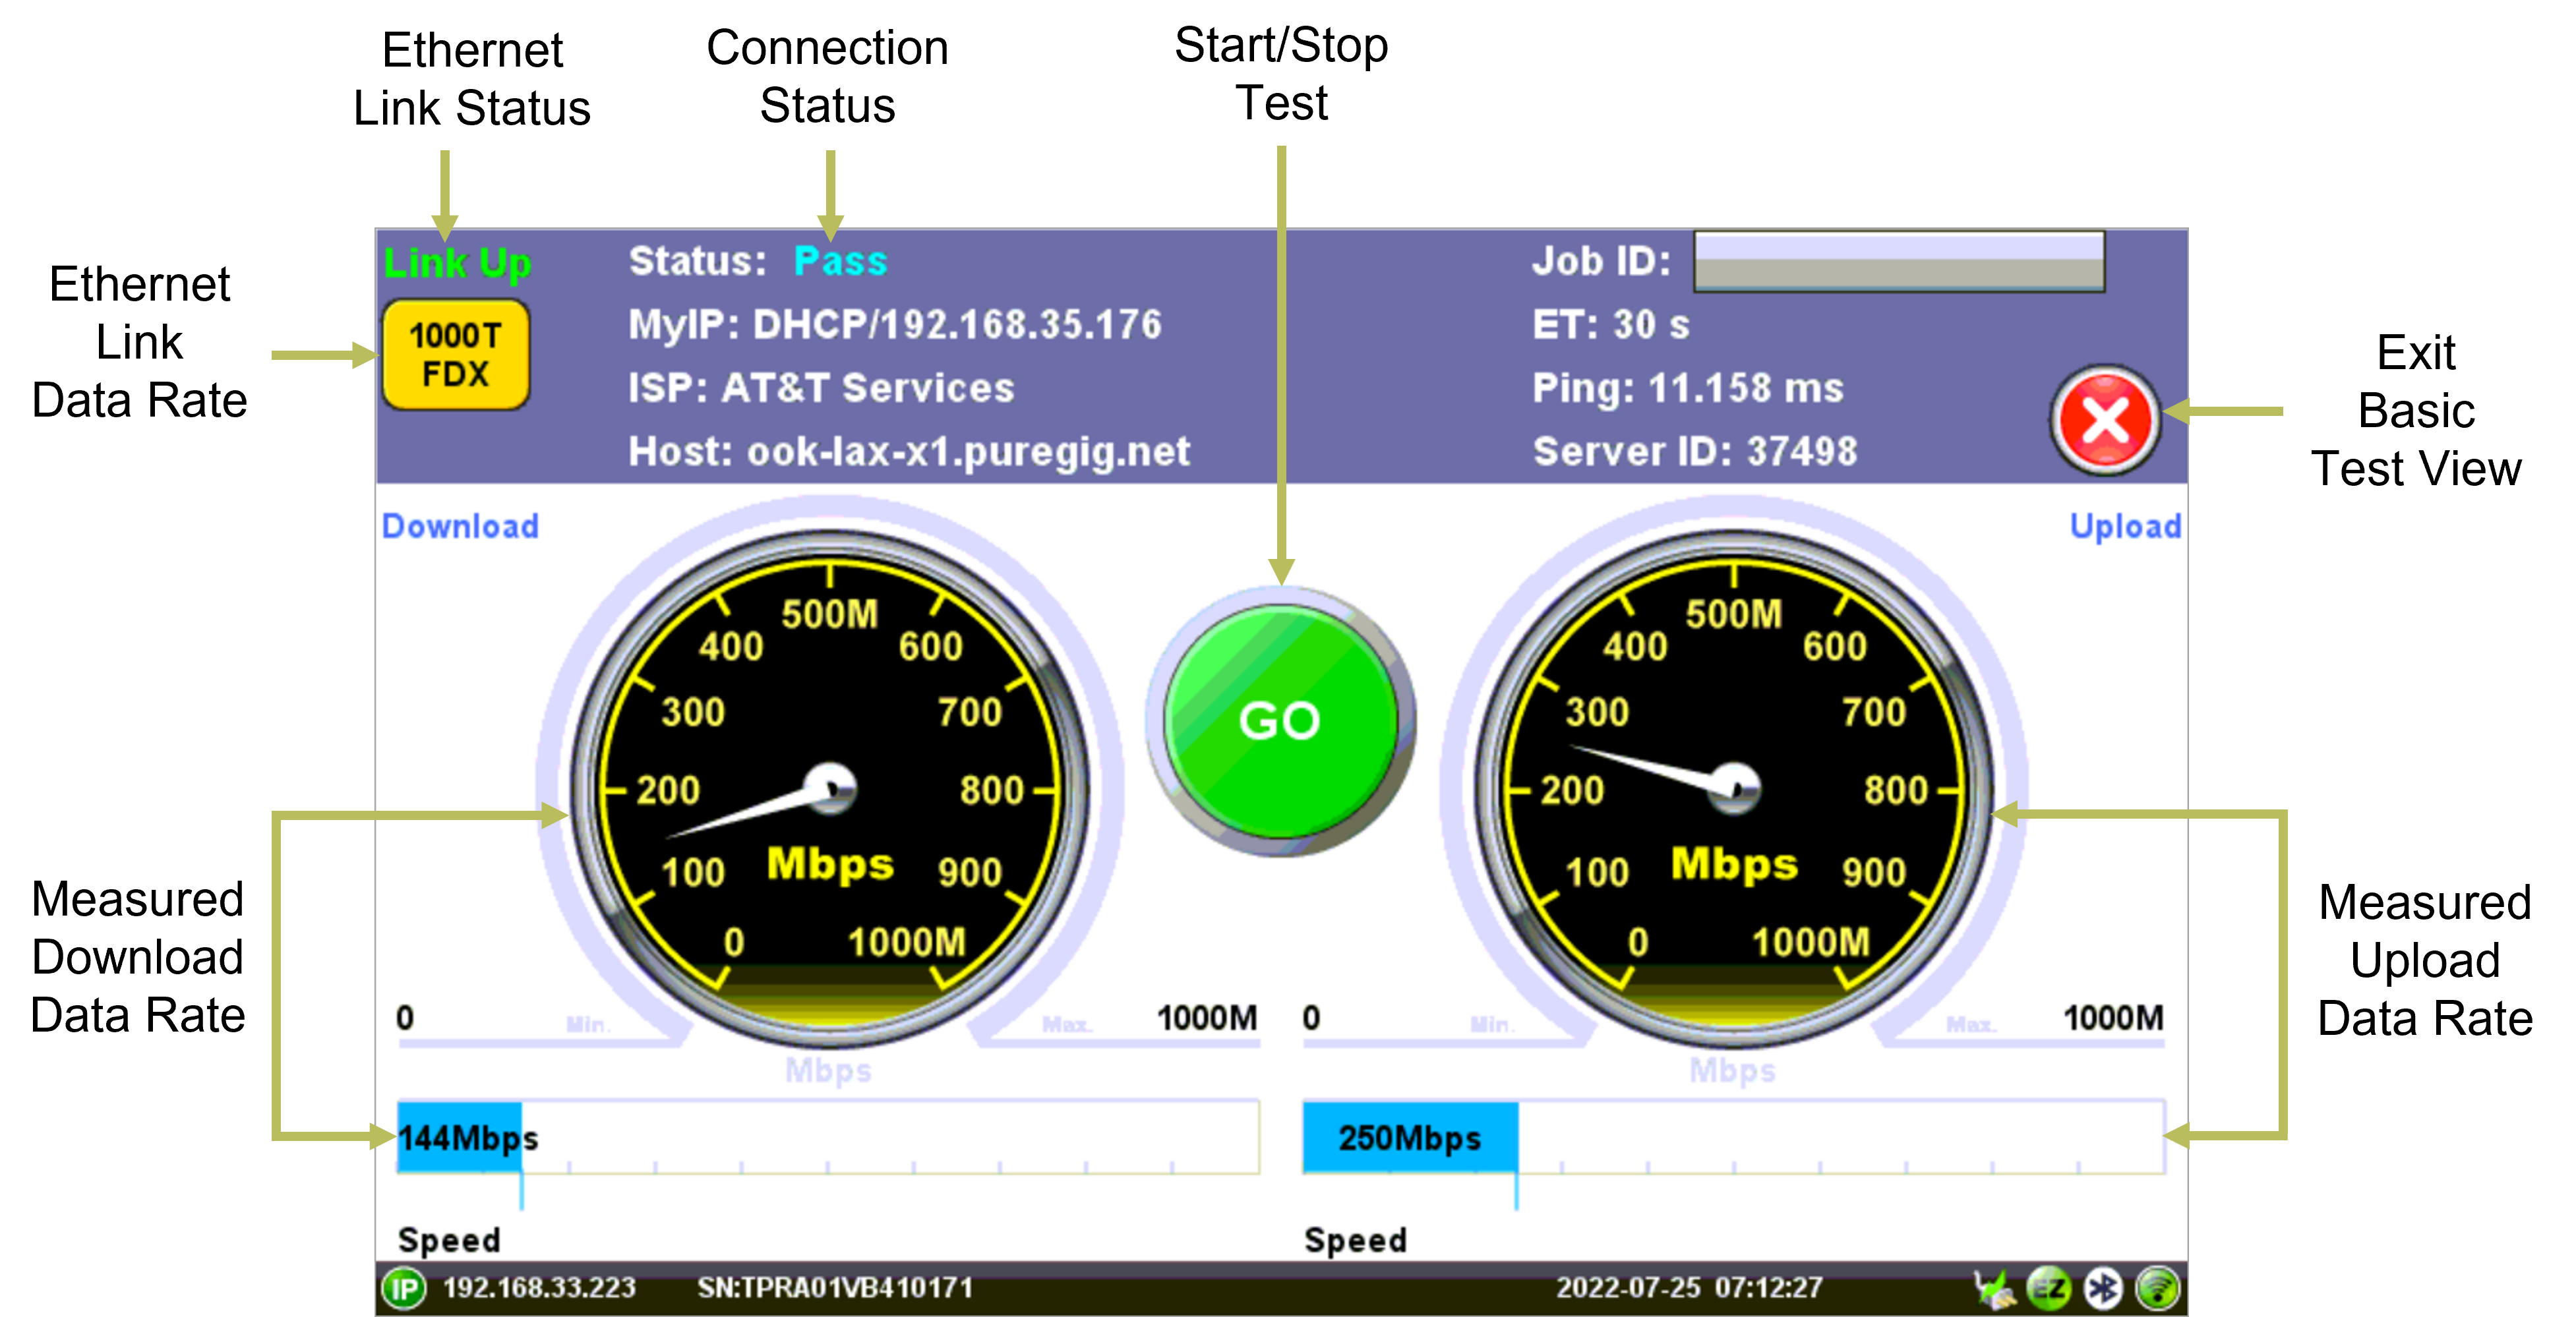
After pressing GO, the test set does the following:
-
Identifies the internet service provider (ISP) and searches for the closest Ookla Speedtest® server, based on round-trip response times.
-
Runs the Internet speed test for the Download direction (from server to test set), then the Upload (from test set to server) and displays the results.
-
Once finished, the GO button will turn back to green. It is ready to save the results and/or run more tests.
Basic V-TEST
ISP & Sponsored Server Selection Modes
V-TEST or Speedtest® verify/certify the Internet Access data rates which are the rates advertised by the Internet (access) Service Provider (ISP), from the customer's premises to the point of entry to the Internet. For that reason, the selection of the centralized speed test server is very important.
Before starting the Download and Upload throughput tests, the test set pings nearby servers, then it generally selects the one that has the fastest ping response. However, all the nearby Ookla® servers would be a combination of ISP-owned or sponsored servers, and some other servers that are hosted by independent companies, which may reside outside of the footprint of the ISP providing the service. Testing to a server that is not owned/sponsored by the ISP may not guarantee reliable test results, since the server has not been vetted by the ISP providing the service.
Turning the ISP/Sponsor Match setting ON, instructs the test set to prioritize the server search for servers that are sponsored by the ISP and select one of these servers for testing. If no ISP-sponsored servers are found, then the test set would carry out its normal search for the fastest ping-response server.
Full V-TEST
Managed Server Tests
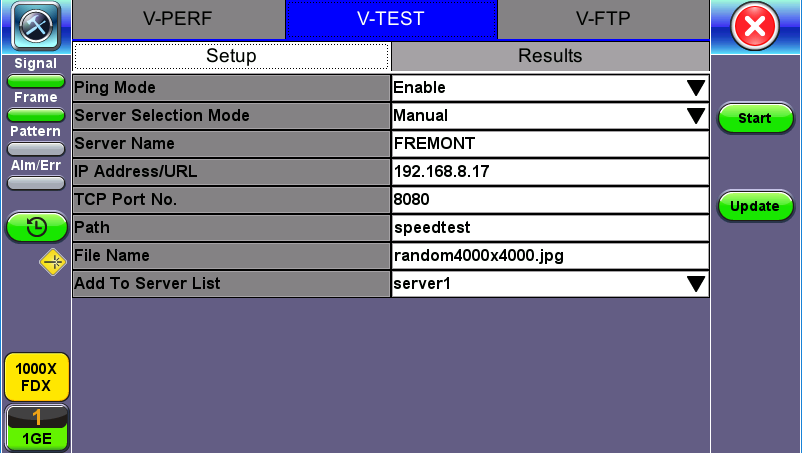
Server Named FREMONT Can Be Added to server1
Creating New Server Profiles and Server Lists
- From the Setup tab, select Manual from Server Selection Mode.
-
to switch to the Full V-TEST screen and access more test details.
 More about Advanced V-TEST Modes
Server Selection Modes
-
Ookla® Speedtest®
Speed Test Modes
Auto Mode: This is the default and recommended mode, and it is also known as "Speedtest Powered" mode. It automatically selects the best speedtest.net server from lists maintained by Ookla. It will scan nearby servers in the local market and test to the server with the fastest (lowest latency) response.
Manual Mode: Manually select a specific Server ID from a list of public Ookla servers. A list of all nearby servers is displayed automatically. The corresponding server ID and server information (URL/IP, location, and ISP) are also provided.
-
VeEX Managed – Perform internet speed tests by manually selecting servers from lists created and maintained by VeEX. These non-public lists are created for specific customers. The Update button is used to update the servers' list. Internet access is required to receive the server lists maintained by VeEX.
-
User Managed – Advanced users can perform internet speed tests by manually selecting servers from pre-configured lists, using the Manual mode. In User Managed mode, enter the server IP/URL and save it to a server list that can be maintained and managed on its own. Options to modify or delete server lists are available under Server List Manage.
-
Manual – Advanced users, with detailed knowledge of their Speedtest servers, can manually add their own servers, test files and maintain their own server lists. Enter the IP/URL of the server to test. If TCP port number 8080 is used, there is no need to enter a Path and File name. Port 8080 is used by Ookla netgauge servers, therefore the proper Speedtest handshaking will take place between the test set (client) and Ookla server. If TCP port number 80 is used, the correct Path and Filename need to be entered.
 Tap
Tap  to switch to the Basic V-TEST view.
 -
- Tap Update and select a file to transfer. The File Name and Path will populate into the field. After setting up the new server profile, tap the Add To Server List drop-down menu. Save as new creates a new server list and adds the current server profile to that list. The option to add the profile to an existing server list is also available.
- Server profiles and server lists created from here are available in Server Selection Mode > User Managed.
Server Named FREMONT Can Be Added to server1
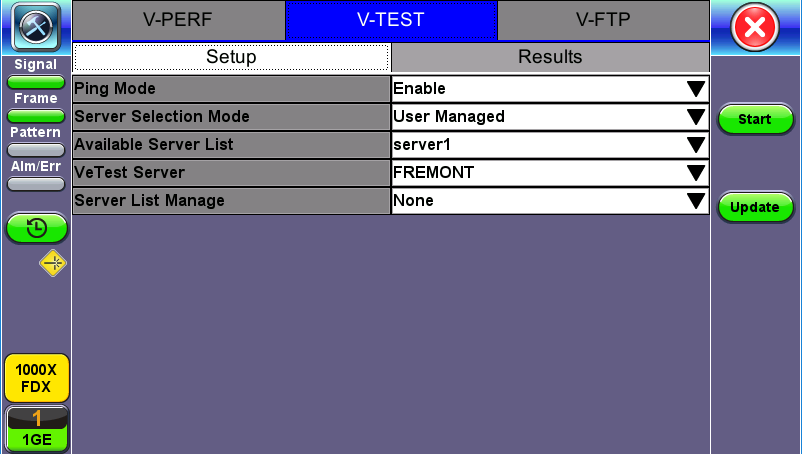
FREMONT and server1 appearing in User Managed
Starting a V-TEST
Select a server from User Managed or VeEX Managed. Enabling Ping mode simultaneously runs a Ping test. Ping Response results will appear under the Results tab. Tap GO to initiate testing. The download test starts first, followed by the upload test.
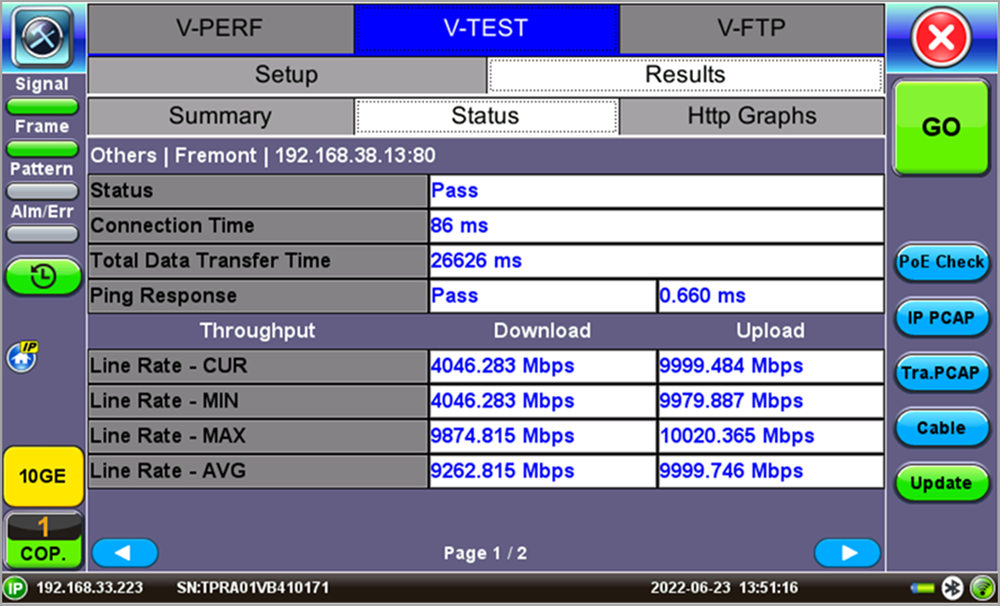
V-TEST - Results - Status
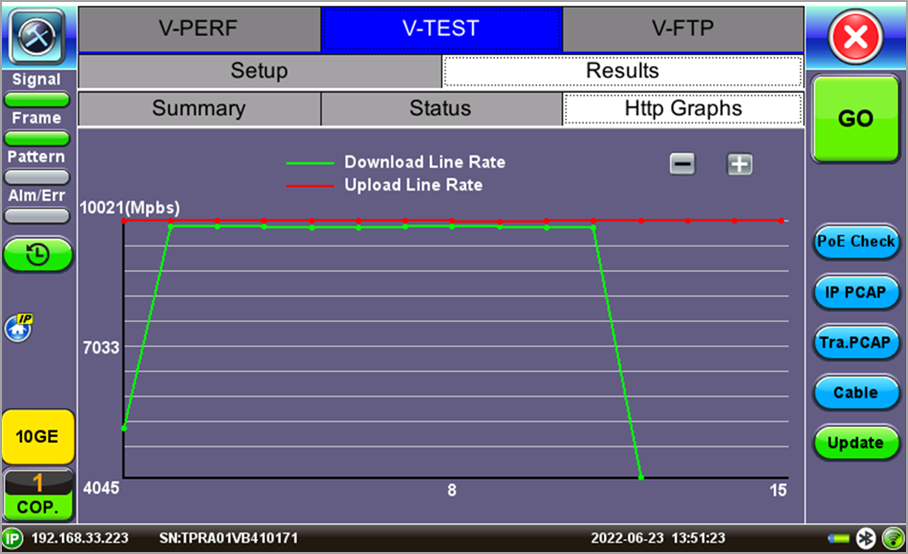
V-TEST - Results - Http Graphs
|
Link Status Indicator Labels A yellow status box will be displayed when the link has been properly established with the port under test and it is considered active. |
|
10GE: |
10 Gbit/s, 10GBASE-T copper interface (RJ45 UTP) or 10GBASE-X optical interface (LC-UPC duplex) |
|
5GE: |
5 Gbit/s, 5GBASE-T copper interface (RJ45 UTP) or 5GBASE-X optical interface (LC-UPC duplex) |
|
2.5GE: |
2.5 Gbit/s, 2.5GBASE-T copper interface (RJ45 UTP) or 2.5GBASE-X optical interface (LC-UPC duplex) |
|
1GE: |
1 Gbit/s, 1GBASE-T copper interface (RJ45 UTP) or 1GBASE- optical interface (LC-UPC duplex) |
|
1000T: |
1 Gbit/s, 1000BASE-T copper interface (RJ45 UTP) |
|
100T: |
100 Mbit/s, 100BASE-T copper interface (RJ45 UTP) |
|
10T: |
10 Mbit/s, 10BASE-T copper interface (RJ45 UTP) |
|
FDX: |
Full Duplex |
|
HDX: |
Half Duplex |
|
UTP: |
Unshielded Twisted (copper) Pairs cable |