Working with Saved Results, Profiles, Images
Access the File Manager by selecting
![]() to select the desired file(s) or
choose all files by selecting the check box in the top header row.
to select the desired file(s) or
choose all files by selecting the check box in the top header row.
Table Sorting
Tap a column header to sort the table in ascending or descending order by the column selected.
Tap the ![]()
At the top of the screen, tap the
|
|
Displays full filename. |
|
|
Select columns to make visible. |
|
|
Displays all records. |
|
|
Search for specific file(s) using advanced search terms. |
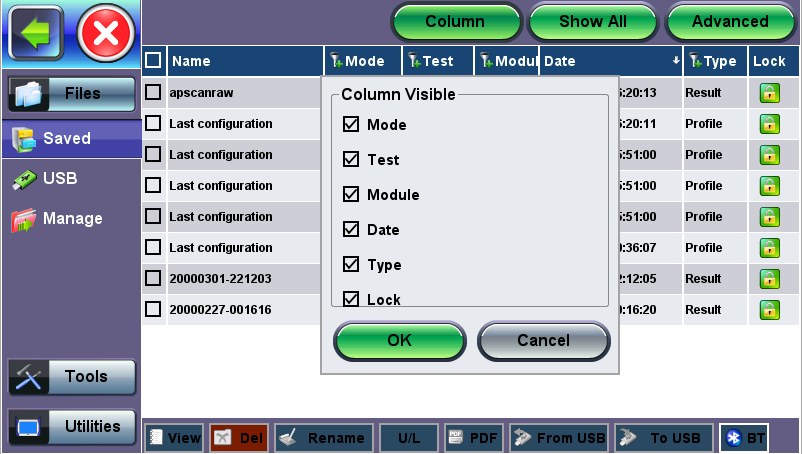
Selecting columns to make visible
Viewing and Managing Files
Use the options at the bottom of the screen to manage selected file(s).
|
|
Opens the selected test report (one). |
|
|
Closes the current test report and returns to File Manager. |
|
|
Exits the File Manager. |
|
|
Deletes all unlocked test reports that are selected with checkmarks. |
|
|
Renames the selected test report (one). |
|
|
Unlocks or Locks test reports. Locked reports are identified by a red padlock icon. Locked test reports cannot be deleted or renamed. |
|
|
Generates a PDF copy of the test report and stores it in an attached USB memory stick (required) for distribution (e.g., via email). |
|
|
Imports (restores) all test results, test profiles and screenshots stored in an attached USB Memory Stick. The included On-The-Go (OTG) micro-B USB to USB-A adapter cable is required for the USB memory stick. |
|
|
Exports (backup) all selected test results, test profiles and screenshots stored to an attached USB Memory Stick. The included On-The-Go (OTG) micro-B USB to USB-A adapter cable is required for the USB memory stick. |
|
|
Transfers selected test results, test profiles and screenshot files to a paired Bluetooth® smartphone, tablet or PC. |
|
|
Loads the selected test profile, if supported. |
|
|
Loads the selected test profile and runs the test, if supported. |
Enabling To USB and From USB Functions
- Insert a USB Memory stick (FAT32 file format) into a USB port on the side of the unit.
- Wait for the USB memory to be detected
 )
)
Downloading Files To USB
- Select the test results, test profiles, screen capture files to be saved. For a full backup, tap the check box in the top header row to select all files.
- At the bottom of the screen, tap the To USB button
 to initiate the file transfer procedure and wait for the progress bar to finish. Original files won’t be deleted from the test set. Each file is saved into it's own folder using the "MyVeEX" tree directory format.
 - When all files have been copied to the USB, tap the folder icon (top-right corner)
Exporting Files to Mobile Devices via Bluetooth
![]() Applies to test sets with optional built-in Bluetooth or compatible Bluetooth USB dongle attached.
Applies to test sets with optional built-in Bluetooth or compatible Bluetooth USB dongle attached.
- Select the test results, test profiles, screen capture files to be exported. For a full backup, tap the check box in the top header row to select all files.
- At the bottom of the
screen, tap
 . The test set scans for
Bluetooth devices automatically.
. The test set scans for
Bluetooth devices automatically. - After pairing the device, tap Send to export the selected files. Original files won’t be deleted from the test set. Each file is saved into it's own folder using the "MyVeEX" tree directory format.
Exporting Results to PDF
- Select the test result files to be exported.
- At the bottom of the
screen, tap
 .
A "PDF file will be generated to USB disk" message appears.
.
A "PDF file will be generated to USB disk" message appears. - Tap Yes.