Configuring PTP Master Emulation
Refer to the Slave Emulation section for detailed information. The test set is by no means a true Grandmaster. This functionality is offered for quick SC health check verifications, troubleshooting, experimenting and training purposes.
-
In the Advanced Tools menu, select 1588v2/PTP.
-
Set 1588v2 Profile to the required standard profile, from the available list. This will populate the rest of the configuration fields with the appropriate default values. To measure Time Error (TE) in modern telecom time profile, select G.8275.1.
-
ITU-T G.8275.1 Precision Time Protocol (PTP) Telecom profile for Phase/Time synchronization with Full Timing Support (FTS) from the network
-
ITU-T G.8265.1 Precision Time Protocol (PTP) Telecom profile for Frequency synchronization
-
IEEE/IEC 61850-9-3 Precision Time Protocol (PTP) profile for power utility automation
-
PTP profile for LAN/MAN Timing Sensitive Networks (also known as gPTP or IEC 60802)
-
Profile for Use of IEEE-1588 Precision Time Protocol in Professional Broadcast Applications
-
-
Select the Clock Mode to emulate the Master (time server) side. If SyncE was previously configured, this field would already be set to match the SyncE settings. Time Error (TE) measurements are not available in this emulation mode.
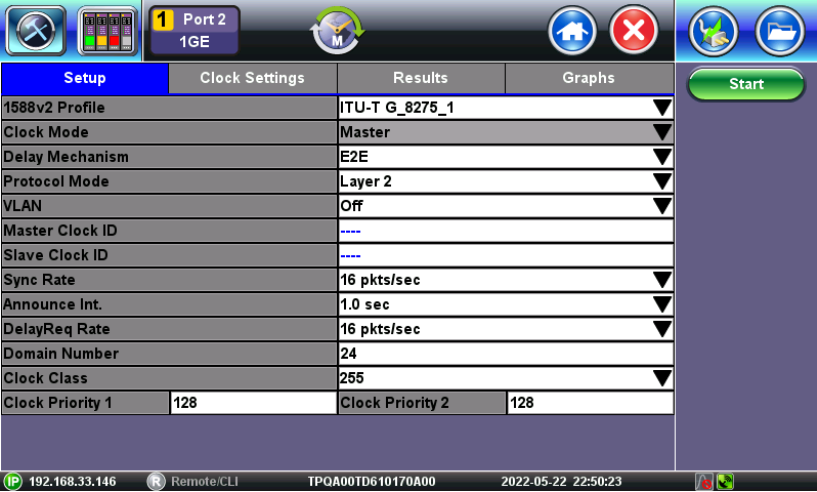
Clock Mode
-
Delay Mechanism: End-to-End (E2E) or Peer-to-Peer (P2P) path delay calculation method.
-
Layer 3 E2E: End-to-end measurement (Delay_Req, Delay_Resp) over Layer 3 IP (Internet Protocol).
-
Layer 2 P2P: Peer-to-peer measurement (Pdelay_Req, Pdelay_Resp) over Layer 2 IEEE 802.3 Ethernet links.
-
-
Protocol Mode: Layer 2, Layer3 IPv4 UDP, or Layer 3 IPv6 UDP protocol encapsulation. For Layer 3 applications, users must configure and stablish a valid IP connection through the selected Test Port, using the IP configuration menu.
-
Transfer Mode: If configures as Layer 3, select Unicast or Multicast to match the IPv4 or IPv6 network environment.
-
Master IP: If configured as Layer 3 Unicast, enter the IP address of the Grandmaster.
-
VLAN: OFF (no VLAN) or 1 VLAN tag (ID and Priority).
-
Master Clock ID: Automatically assigned to the Grandmaster (GM) emulation function. This field gets automatically populated once the emulation is started.
-
Slave Clock ID: Received from the Slave Clock (SC). This field gets populated once the emulation is started and the SC is detected.
-
Sync Rate: If configured as Layer 3 Unicast, select the Sync messages rate to match the settings in the Grandmaster.
-
Announce Inter
-
DelayReq Rate: If set to Layer 3 Unicast, set the required DelayRequest messages rate sent by the Slave clock.
-
val: Periodicity of the Announce messages sent by the Slave clock.
-
Domain Number: Enter the applicable value to match the target network environment.
-
GM Clock Class: Enter the applicable clock class for the GM emulation function, based on the timing reference source being used to drive this test set. Some examples of clock classes are:
-
6 T‐GM Locked to a PRTC synchronized to PTP/TAI timescale from a PRTC (for example, traceable to GNSS)
-
7 T‐GM in Holdover (previously synchronized to PRTC), within holdover specification
-
13 T‐GM locked to an application specific (arbitrary) timescale
-
14 T-GM in Holdover (previously synchronized to an arbitrary timescale reference), within holdover specification
-
140 T‐GM in Holdover, out of holdover specification
-
150 T‐GM in Holdover, out of holdover specification
-
160 T‐GM in Holdover, out of holdover specification
-
248 T‐GM without time reference since start‐up
-
-
Clock Priority 1: Enter the desired clock priority value.
-
Clock Priority 2: Enter the desired clock priority value.
Once the configuration has been finished press the Start button to initiate the Master emulation.

Master emulation
Go to the Results tab to see numeric and protocol information.