Jitter Measurement & Generation (Jitter button)
Tapping the Jitter button displays the Jitter Measurement and Generation screen.
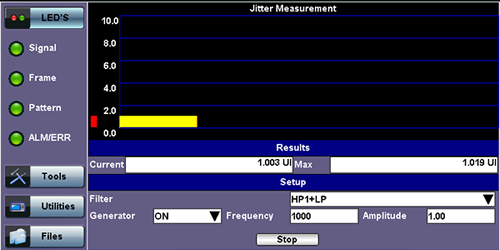
Jitter Measurement and Generation Menu
The Jitter measurements menu allows the user to measure and analyze received signal jitter. The measurement example is shown above (the vertical grid spacing is 2.0 UIpp). The red bar indicates Max. peak jitter during testing and the yellow bar indicates the current peak jitter.
Setup
Configure the following settings before starting the test:
-
Filter: HP1+LP or HP2+LP. The frequency for each filter varies depending on the setup mode (E1/E3, DS1/DS3). Frequency ranges for each filter and setup mode are listed as follows:
-
E1: HP1+LP (20Hz to 100KHz); HP2+LP (18 Hz to 100KHz)
-
E3: HP1+LP (100Hz to 800KHz); HP2+LP (10KHz to 800KHz)
-
DS1: HP1+LP (10Hz to 40kHz); HP2+LP (8kHz to 40kHz)
-
DS3: HP1+LP (10Hz to 400kHz); HP2+LP (30kHz to 400kHz)
-
-
Generator: ON or OFF.
-
Frequency: 2 Hz to 10,000 Hz for E1(2M) options, 2 Hz to 800,000 Hz for E3 (34M) options. 2 Hz to 40,000 Hz for DS1 (1.5M) options, 2 Hz to 400,000 Hz for DS3(45M) options.
-
Amplitude: Enter the amplitude at which peak to peak jitter generation occurs. See O.172 for the ITU recommendation on minimum jitter generation.
Press Start to start measurements.
Results
Results are displayed for the current jitter value and maximum jitter value during measurement.