FX120 Quick Guide
When powered on the test set automatically loads the GPON application.
Step 1: Power on Test Set
Press and hold the Power button ![]() for two seconds, until a confirmation tone (beep) is heard, and the VeEX logo appears on the screen, then release the power button. The test set will take a few seconds to boot up, automatically start the GPON application, detect the optical light source, load the default test profile, and begin monitoring.
for two seconds, until a confirmation tone (beep) is heard, and the VeEX logo appears on the screen, then release the power button. The test set will take a few seconds to boot up, automatically start the GPON application, detect the optical light source, load the default test profile, and begin monitoring.
![]() To turn the test set OFF, press and hold the Power button
To turn the test set OFF, press and hold the Power button ![]() until two confirmation tones (beeps) are heard.
until two confirmation tones (beeps) are heard.
![]() By default, the test set always starts in GPON mode
By default, the test set always starts in GPON mode ![]() , as indicated by the Test Mode Selection button. It can detect GPON, XG(S)-PON, EPON, and 10G-EPON automatically. When in Speed Test mode, it can detect 10GBASE-T, 5GBASE-T, 2.5GBASE-T, 1000BASE-T and even legacy 10/100BASE-T automatically.
, as indicated by the Test Mode Selection button. It can detect GPON, XG(S)-PON, EPON, and 10G-EPON automatically. When in Speed Test mode, it can detect 10GBASE-T, 5GBASE-T, 2.5GBASE-T, 1000BASE-T and even legacy 10/100BASE-T automatically.
Starting/stopping/restarting measurements from the OPM menu (see OLT and ONT/ONU Messages and Measurements) starts/stops/resets items in the GPON Summary Screen , such as the Power Level Graphs and Active ONU List in Advanced OPM Mode. To clear the PLOAM list, go to the respective PLOAM menu and press the Clear button.
Step 2: Configure Test Profile
Tap Setup and configure the test profile settings according to the PON class and xPON / XGS-PON ITU-T and IEEE Test standards.
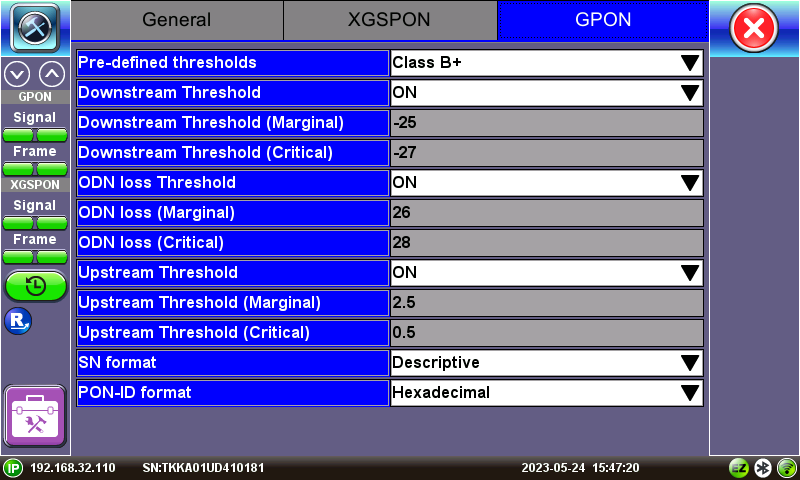
GPON OPM Setup menu
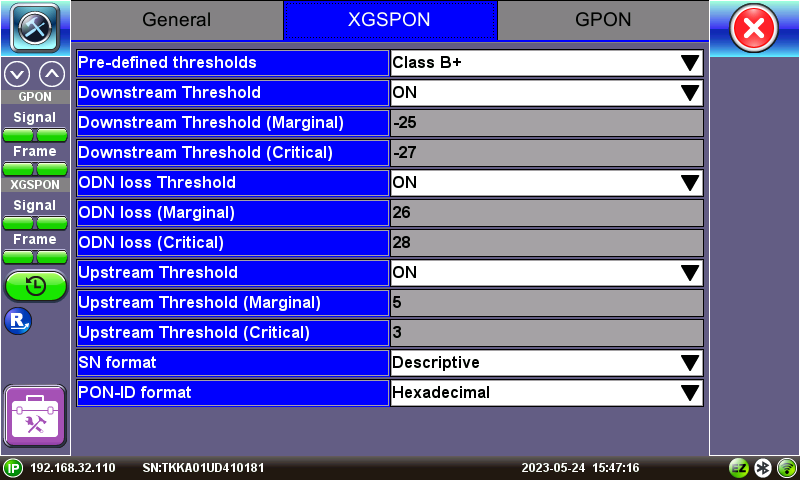
XG(S)-PON OPM Setup menu
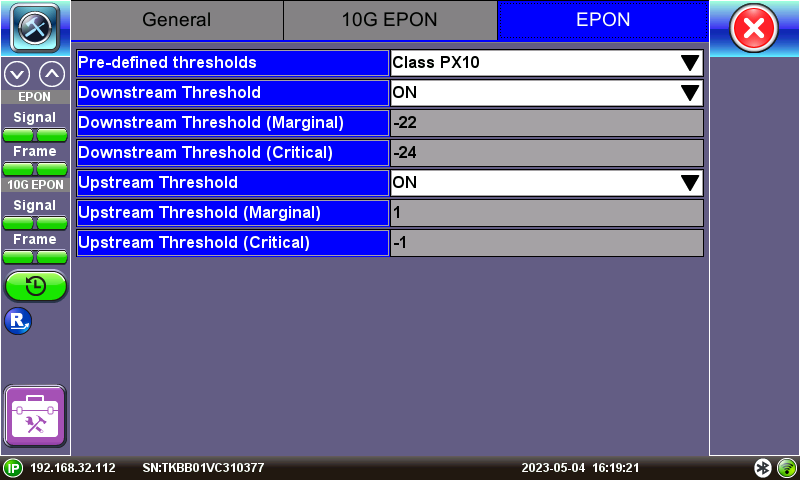
EPON OPM Setup menu
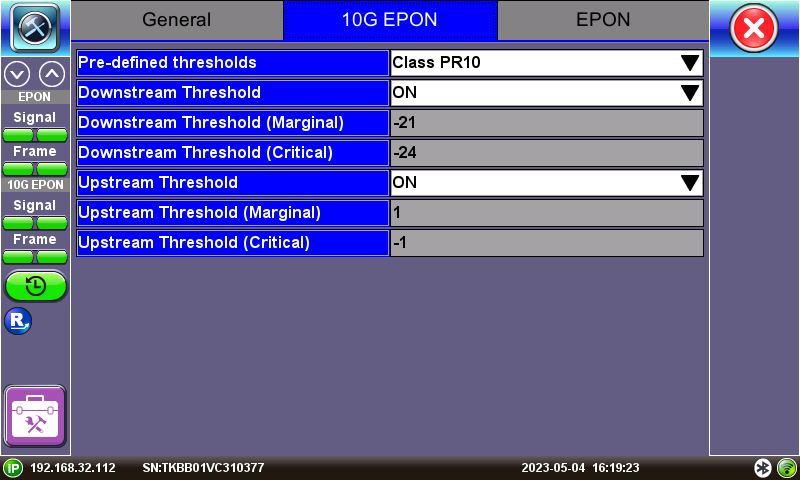
10G EPON OPM Setup menu
Step 3: Insert Patch Cord into FX120 OLT test port.
Inspect and clean the FX120 test ports. Inspect and clean the fiber patch cord from the OLT and insert it into the FX120 OLT test port.
|
|
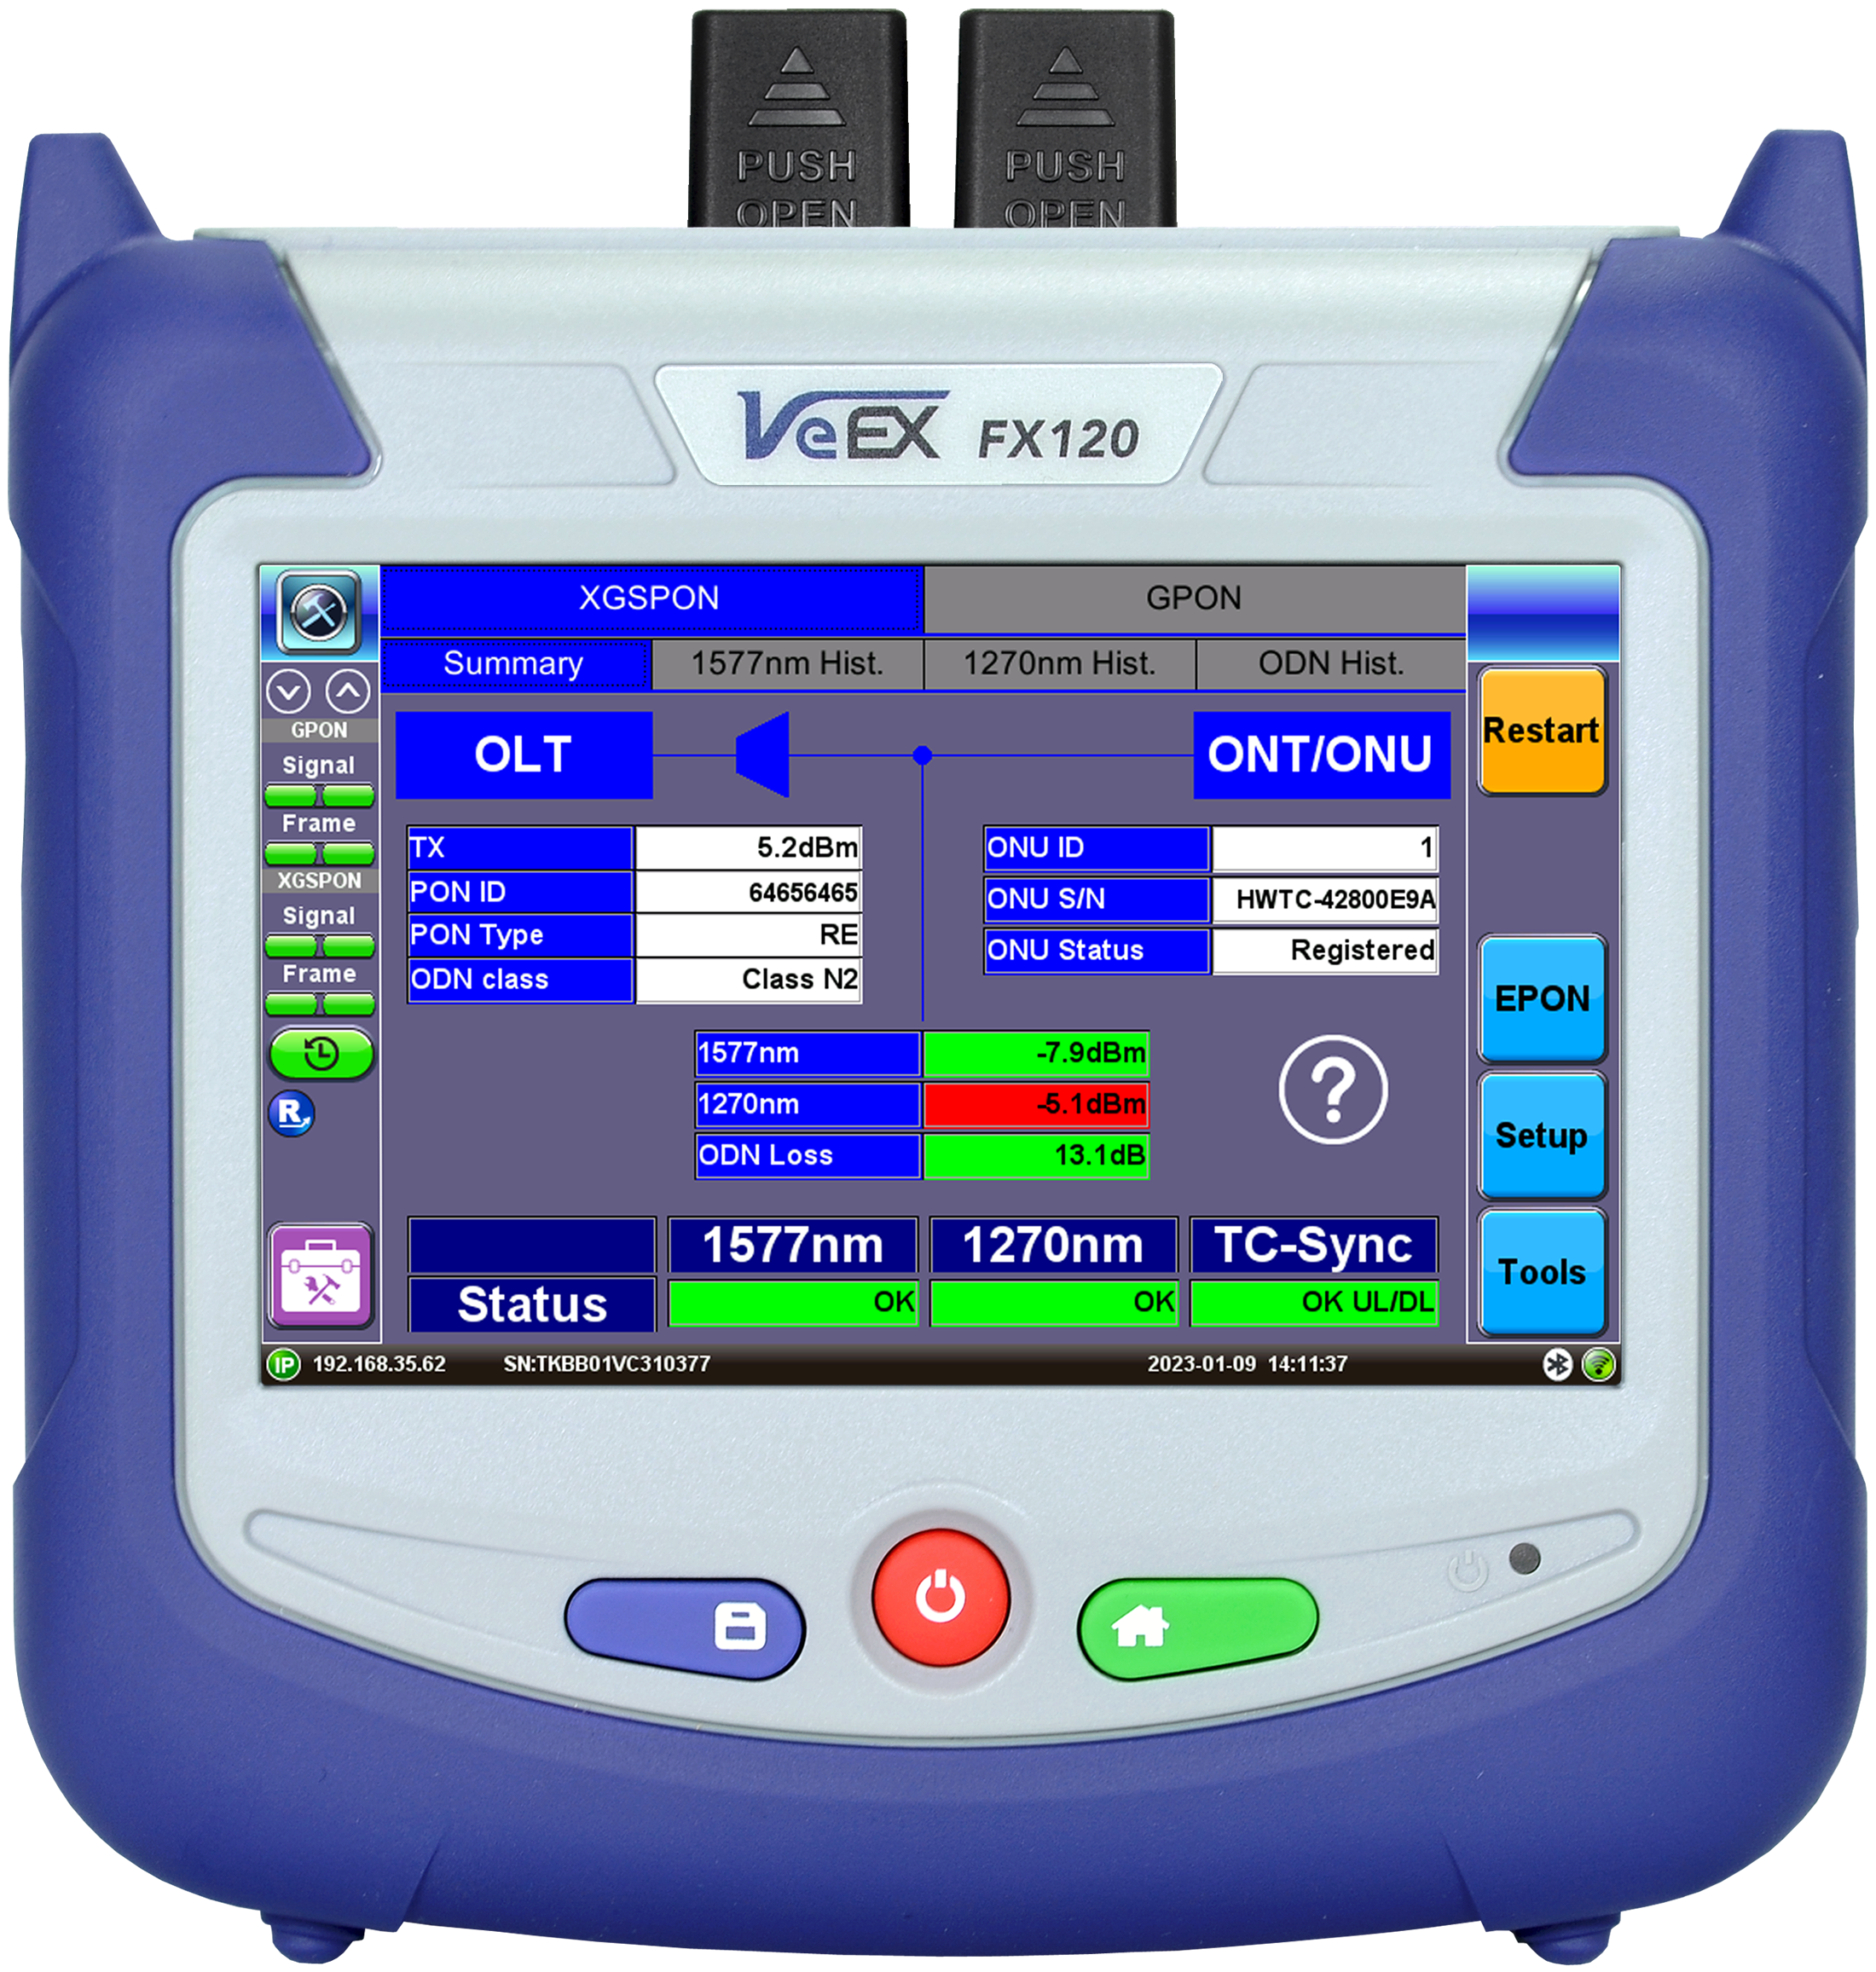
If 1490/1577nm light is detected, the 1490/1577nm Status will display OK. Verify that the measured 1490/1577nm signal level is Green (see Signal and Synchronization Status). Confirm TC-Sync DS displays OK DL.
![]() If you are not able to achieve TC-Sync, contact VeEX technical support.
If you are not able to achieve TC-Sync, contact VeEX technical support.
All DS LEDs should turn from Red to Green. If any LED remains Red, clean and inspect the OLT connectors again.
Step 4: Connect Splitter to FX120 ONU/ONT test port.
Inspect and clean the patch cord connectors and connect the FX120 ONU/ONT test port to the Splitter ONU/ONT test port.
If 1310/1270nm light is detected, the Status will display OK. Verify that the measured 1310/1270nm signal level is Green (see OPM Test Mode).
|
|
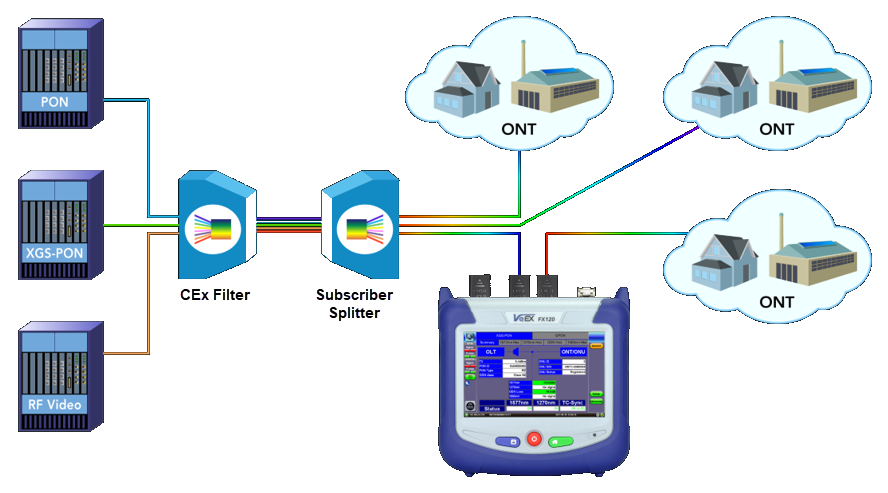
The FX120 should be connected between the splitter and ONT.
![]() If you are not able to achieve TC-Sync, contact VeEX technical support.
If you are not able to achieve TC-Sync, contact VeEX technical support.
All US LEDs should turn from Red to Green. If any LED remains Red, clean and inspect the ONU connections again.
Green, yellow, and red table colors indicate whether signal levels pass or fail against ITU-T/IEEE standard threshold values configured in Setup.
Refer to OPM Setup for information on test profile setup.
 Green: The measured signal is above the critical threshold.
 Yellow: The measured signal is below marginal and above critical.
 Red: The measured signal level is below the critical threshold and does not meet the specification.
Signal and Synchronization Status
The Status table displays detected 1490nm/1577nm downstream, 1310nm/1270nm upstream, and TC-Sync status.

GPON Signal and Synchronization Status Table

XGS-PON Signal and Synchronization Status Table

10G EPON Signal and Synchronization Status Table
Status Table
-
1490nm/1310nm: If OK is displayed, light in the downstream 1490nm or upstream 1310nm direction is detected.
-
1577nm/1270nm: If OK is displayed, light in the downstream 1577nm or upstream 1270nm direction is detected.
-
1577nm/1270nm/1310nm: If OK is displayed, light in the downstream 1577nm or upstream 1270nm direction or upstream 1310nm is detected.
-
Transmission Connectivity Sync (TC-Sync): OK UL/DL indicates that the FX120 is properly synchronized with the OLT and ONU/ONT traffic. No UL/DL indicates the OLT and ONU/ONT are not synchronized properly. Consult VeEX technical support if unable to achieve TC-Sync.
![]() OK indicates US or DS light is detected, but does not indicate whether ITU-T Threshold values (IEEE values for EPON) are met or if the OLT and ONU/ONT are properly synchronized.
OK indicates US or DS light is detected, but does not indicate whether ITU-T Threshold values (IEEE values for EPON) are met or if the OLT and ONU/ONT are properly synchronized.
Step 5: Save Results
Press the SAVE button ![]() and use the touch-screen keypad to enter the name (overwrite or edit), then tap Apply.
and use the touch-screen keypad to enter the name (overwrite or edit), then tap Apply.
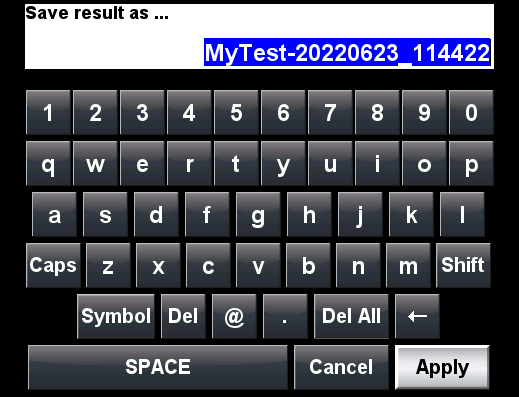
Auto-Naming: By default, the test set auto-naming feature uses the current date and time to generate a default unique name for every test result (YYYYMMDD_hhmmss). The auto name can be rewritten or specific prefix defined to be added to it (e.g., to identify site, cabinet, rack, customer or the technician running the test).
-
From a test application, press
 and/or
  on the top left of the screen to access the system configuration menu.
 -
Select
-
Select the Storage Setting tab and set File Name Prefix to the desired prefix. For example, after setting the File Name Prefix to "MyTest-", all subsequent tests would be automatically named "MyTest-YYYYMMDD_hhmmss".
Upon saving results, a secondary form is displayed to enter additional information about the Job ID/Work Order, technician, location, and comments.
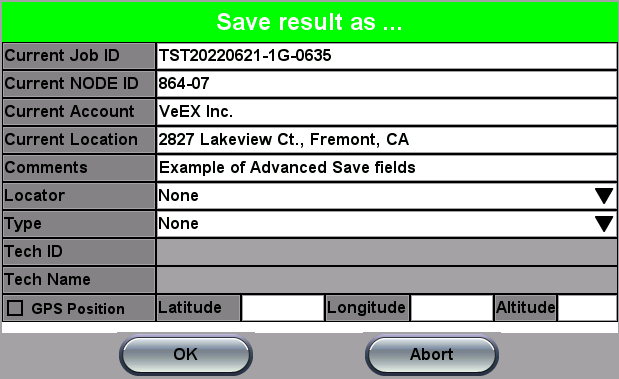
This creates more complete test reports and is required if the test set is registered to the VeSion R-Server Centralized Workflow and Results Management System.
When the Advanced Saving option in
Step 6: View Results & Generate Report
To access the test results stored in the test set:
-
Press
, then press on the top left of the screen. -
Select
-
Select the desired results file to open the test report.
To navigate the test results report, use the links in its Table of Contents and the right rocker switch to scroll Up and Down.
Tap the file to open and display it.
|
|
Navigates right and left to view all files. |
|
|
Closes the current test report and goes back to the File Manager. |
|
|
Exports the selected test report to mobile device via QR Code. |
|
|
Deletes all unlocked test reports that are selected with checkmarks. |
|
|
Renames the selected test report (one). |
|
|
Unlocks or Locks test reports. Locked reports are identified by a red padlock icon. Locked test reports cannot be deleted or renamed. |
|
|
Generates a PDF copy of the test report and stores it in an attached USB memory stick (required) for distribution (e.g., via email). |
|
|
Imports (restores) all test results, test profiles and screenshots stored in an attached USB Memory Stick. The included On-The-Go (OTG) micro-B USB to USB-A adapter cable is required for the USB memory stick. |
|
|
Exports (backup) all selected test results, test profiles and screenshots stored to an attached USB Memory Stick. The included On-The-Go (OTG) micro-B USB to USB-A adapter cable is required for the USB memory stick. |
|
|
Transfers selected test results, test profiles and screenshot files to a paired Bluetooth® smartphone, tablet or PC. |
To transfer results to mobile device:
-
On the Results & Files tab, select the test results to view.
-
Tap
 . The QR Code for EZ Result Transfer screen displays.
 -
Using the mobile device's camera, focus on the QR code and tap it. The results appear in the browser.
![]()
After transferring results to a mobile device via the QR reader, the browser launches automatically and displays them.
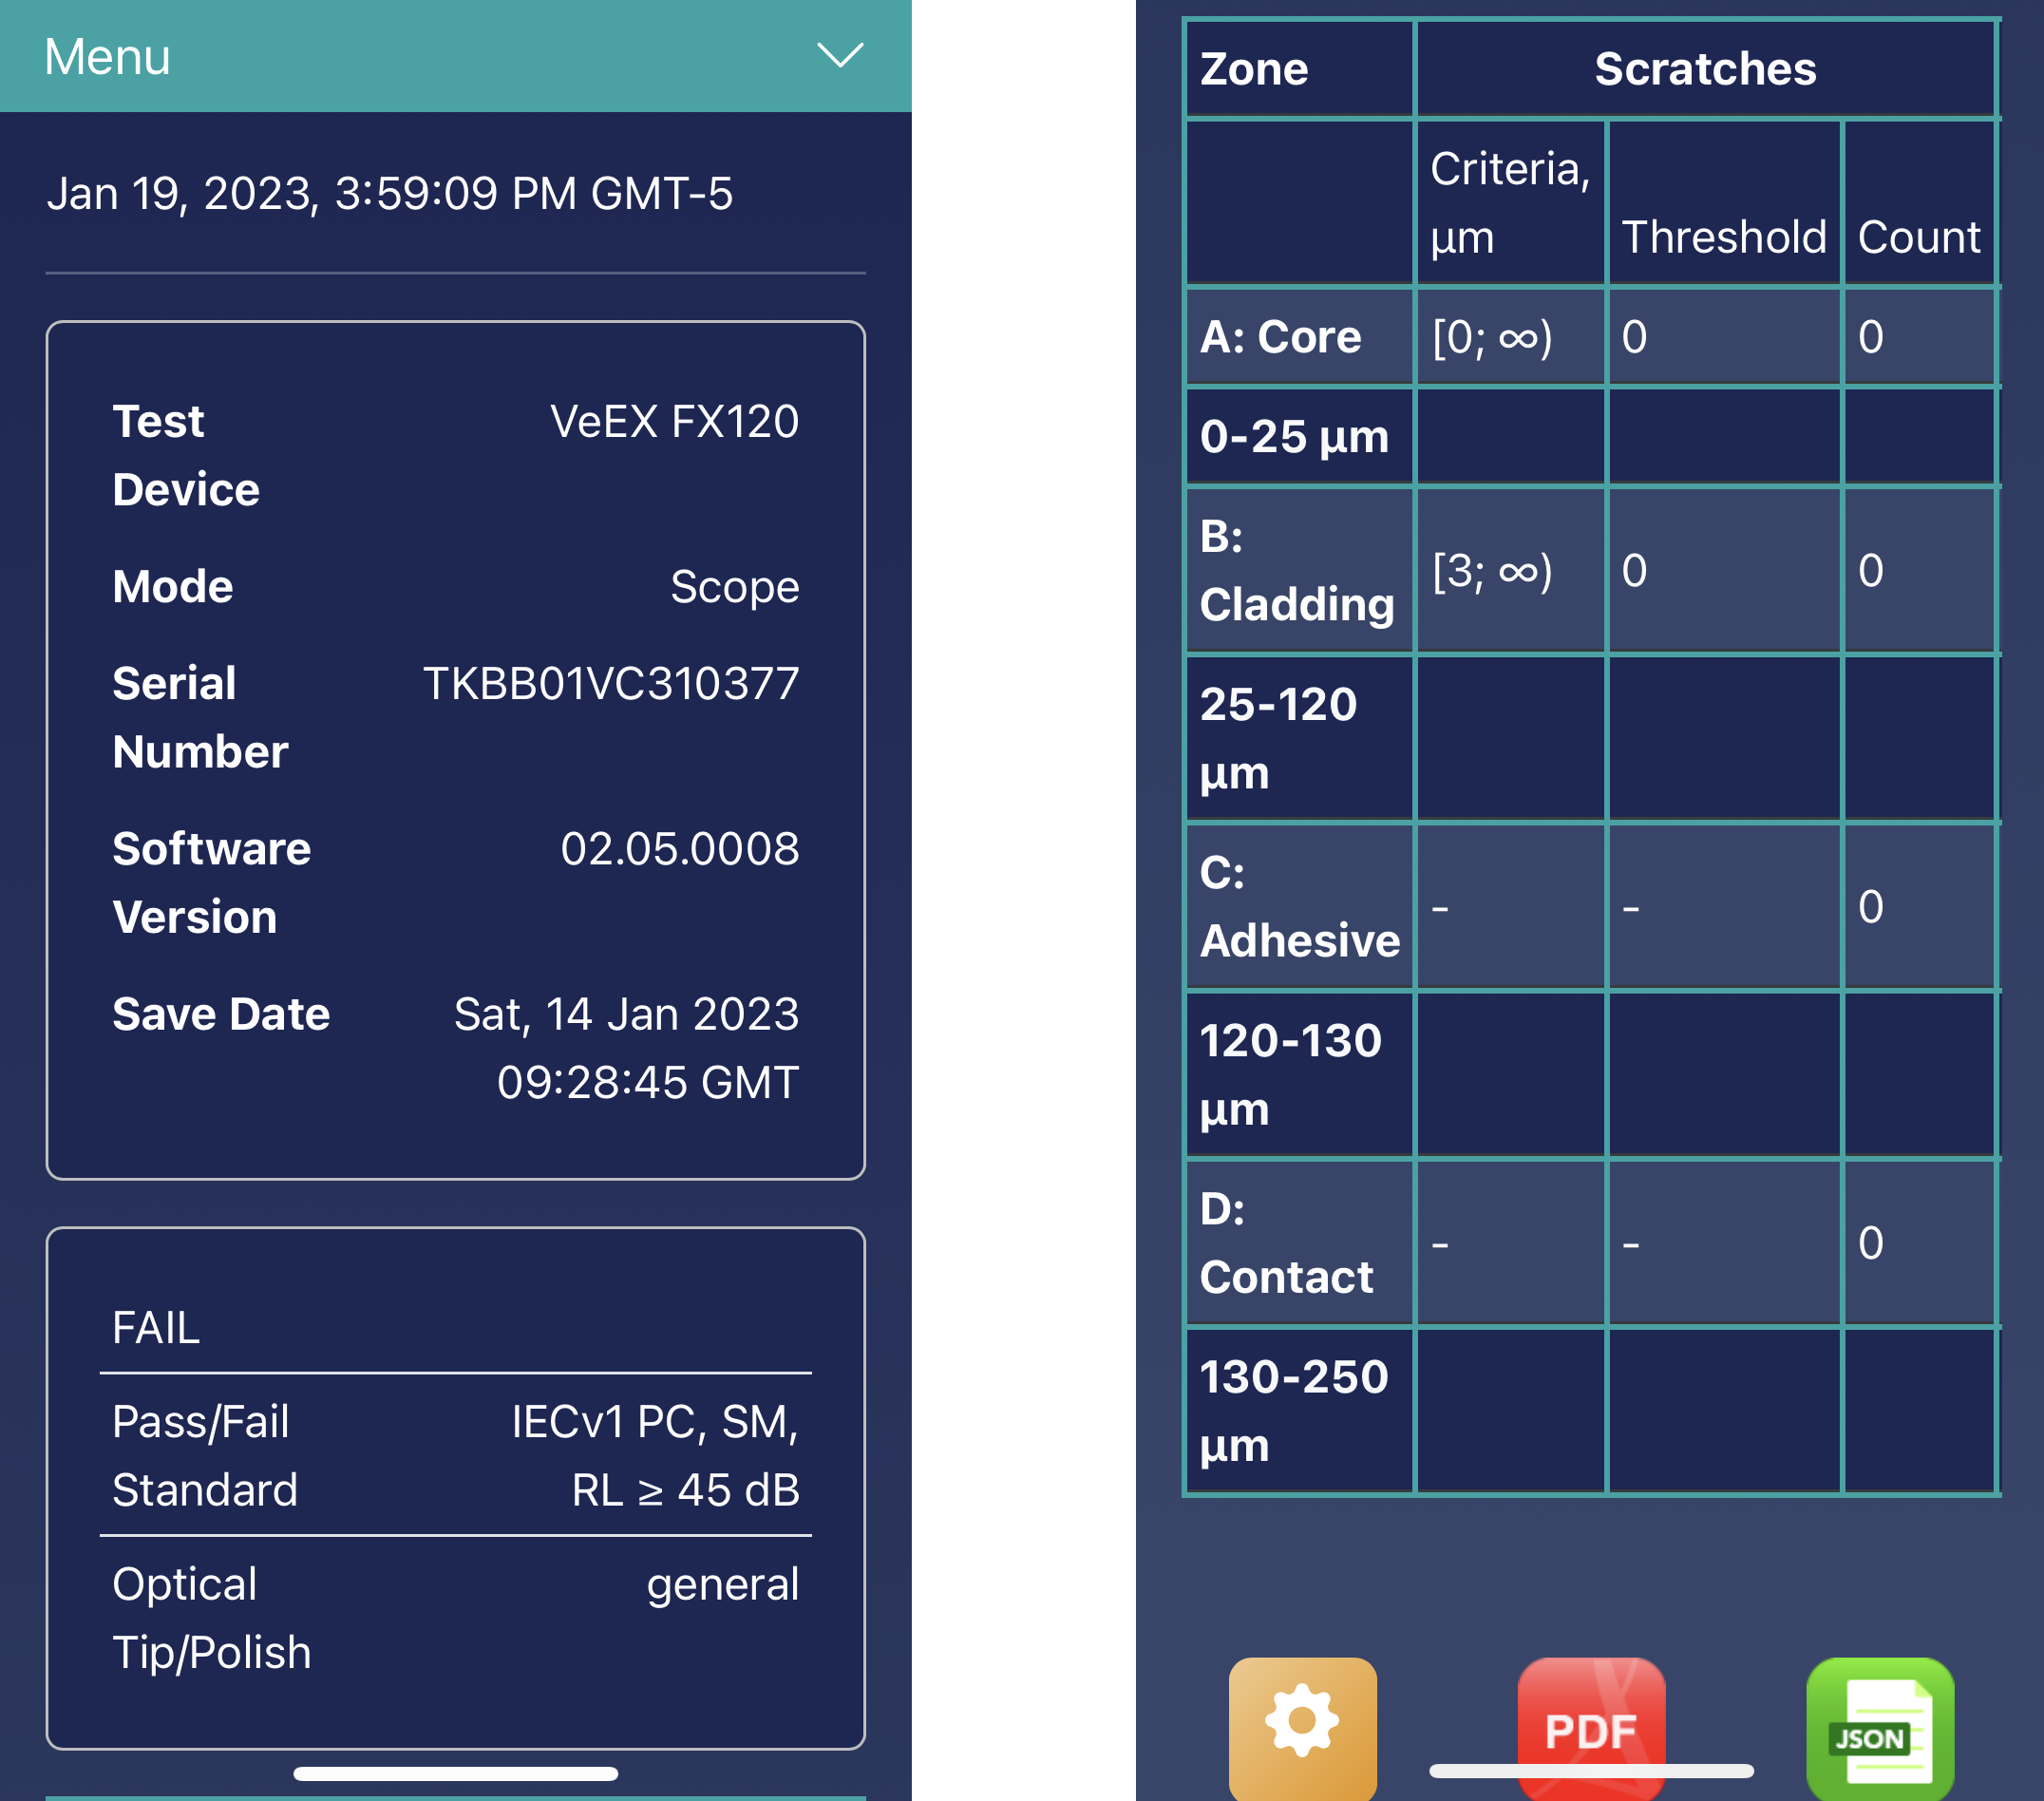
The top of the screen shows the device type, mode, serial number, and software version, and the date results were saved on the device.
Export options appear at the bottom on the screen. Alternatively, tap the Menu drop-down menu to view the options.

Results - Mobile View Export Options
Interactive descriptions of FX120 Speed Test report options.
Interactive descriptions of FX120 GPON/XGS-PON report options.
|
|
Adds/Removes location (GPS coordinates) from results report; customize report with logo. |
|
|
Generates complete report in PDF format, which can be shared with the customer (subscriber) or emailed to a supervisor. |
|
|
Exports to JSON format, for third-party integration or processing. |
|
|
Adds extra job-related information to the report (e.g., Job ID, tech's information, comments, pictures, etc.). |
|
|
Uploads results to R-Server (for R-Server users). |
|
|
Texts results via SMS protocol. |
|
|
Emails current test report. |
|
|
Creates a new project for results so multiple test results, from the same or different test sets, can be combined into a single job report. |
|
|
Opens knowledge base. |
|
|
Opens documentation resources for test set. |
Other Test Features
Fiberscope
The Fiberscope test application can be used in conjunction with any VeEX Digital Fiber Inspection Microscope.
Flow
The Flow application performs and compiles multiple tests into a single job report.
OLTS/OPM
The Fault Locator test application can be used to identify fiber bends and breaks.
OTDR Viewer
This built-in application allows the test platform to view previously saved .sor trace results and edit events, as needed. IF an OPX-BOXe is connected to the platform via direct USB connection, WiFi or Bluetooth®., this built-in application can also be used to control all OTDR test functions.
V-TEST
The V-TEST feature qualifies network TCP/HTTP protocol performance by testing Internet speeds up to a full line rate against a server to verify the maximum download and upload data rates attainable by subscribers' high-speed or Gigabit Internet services.