FX160 Bidirectional Fiber Testing Quick Guide
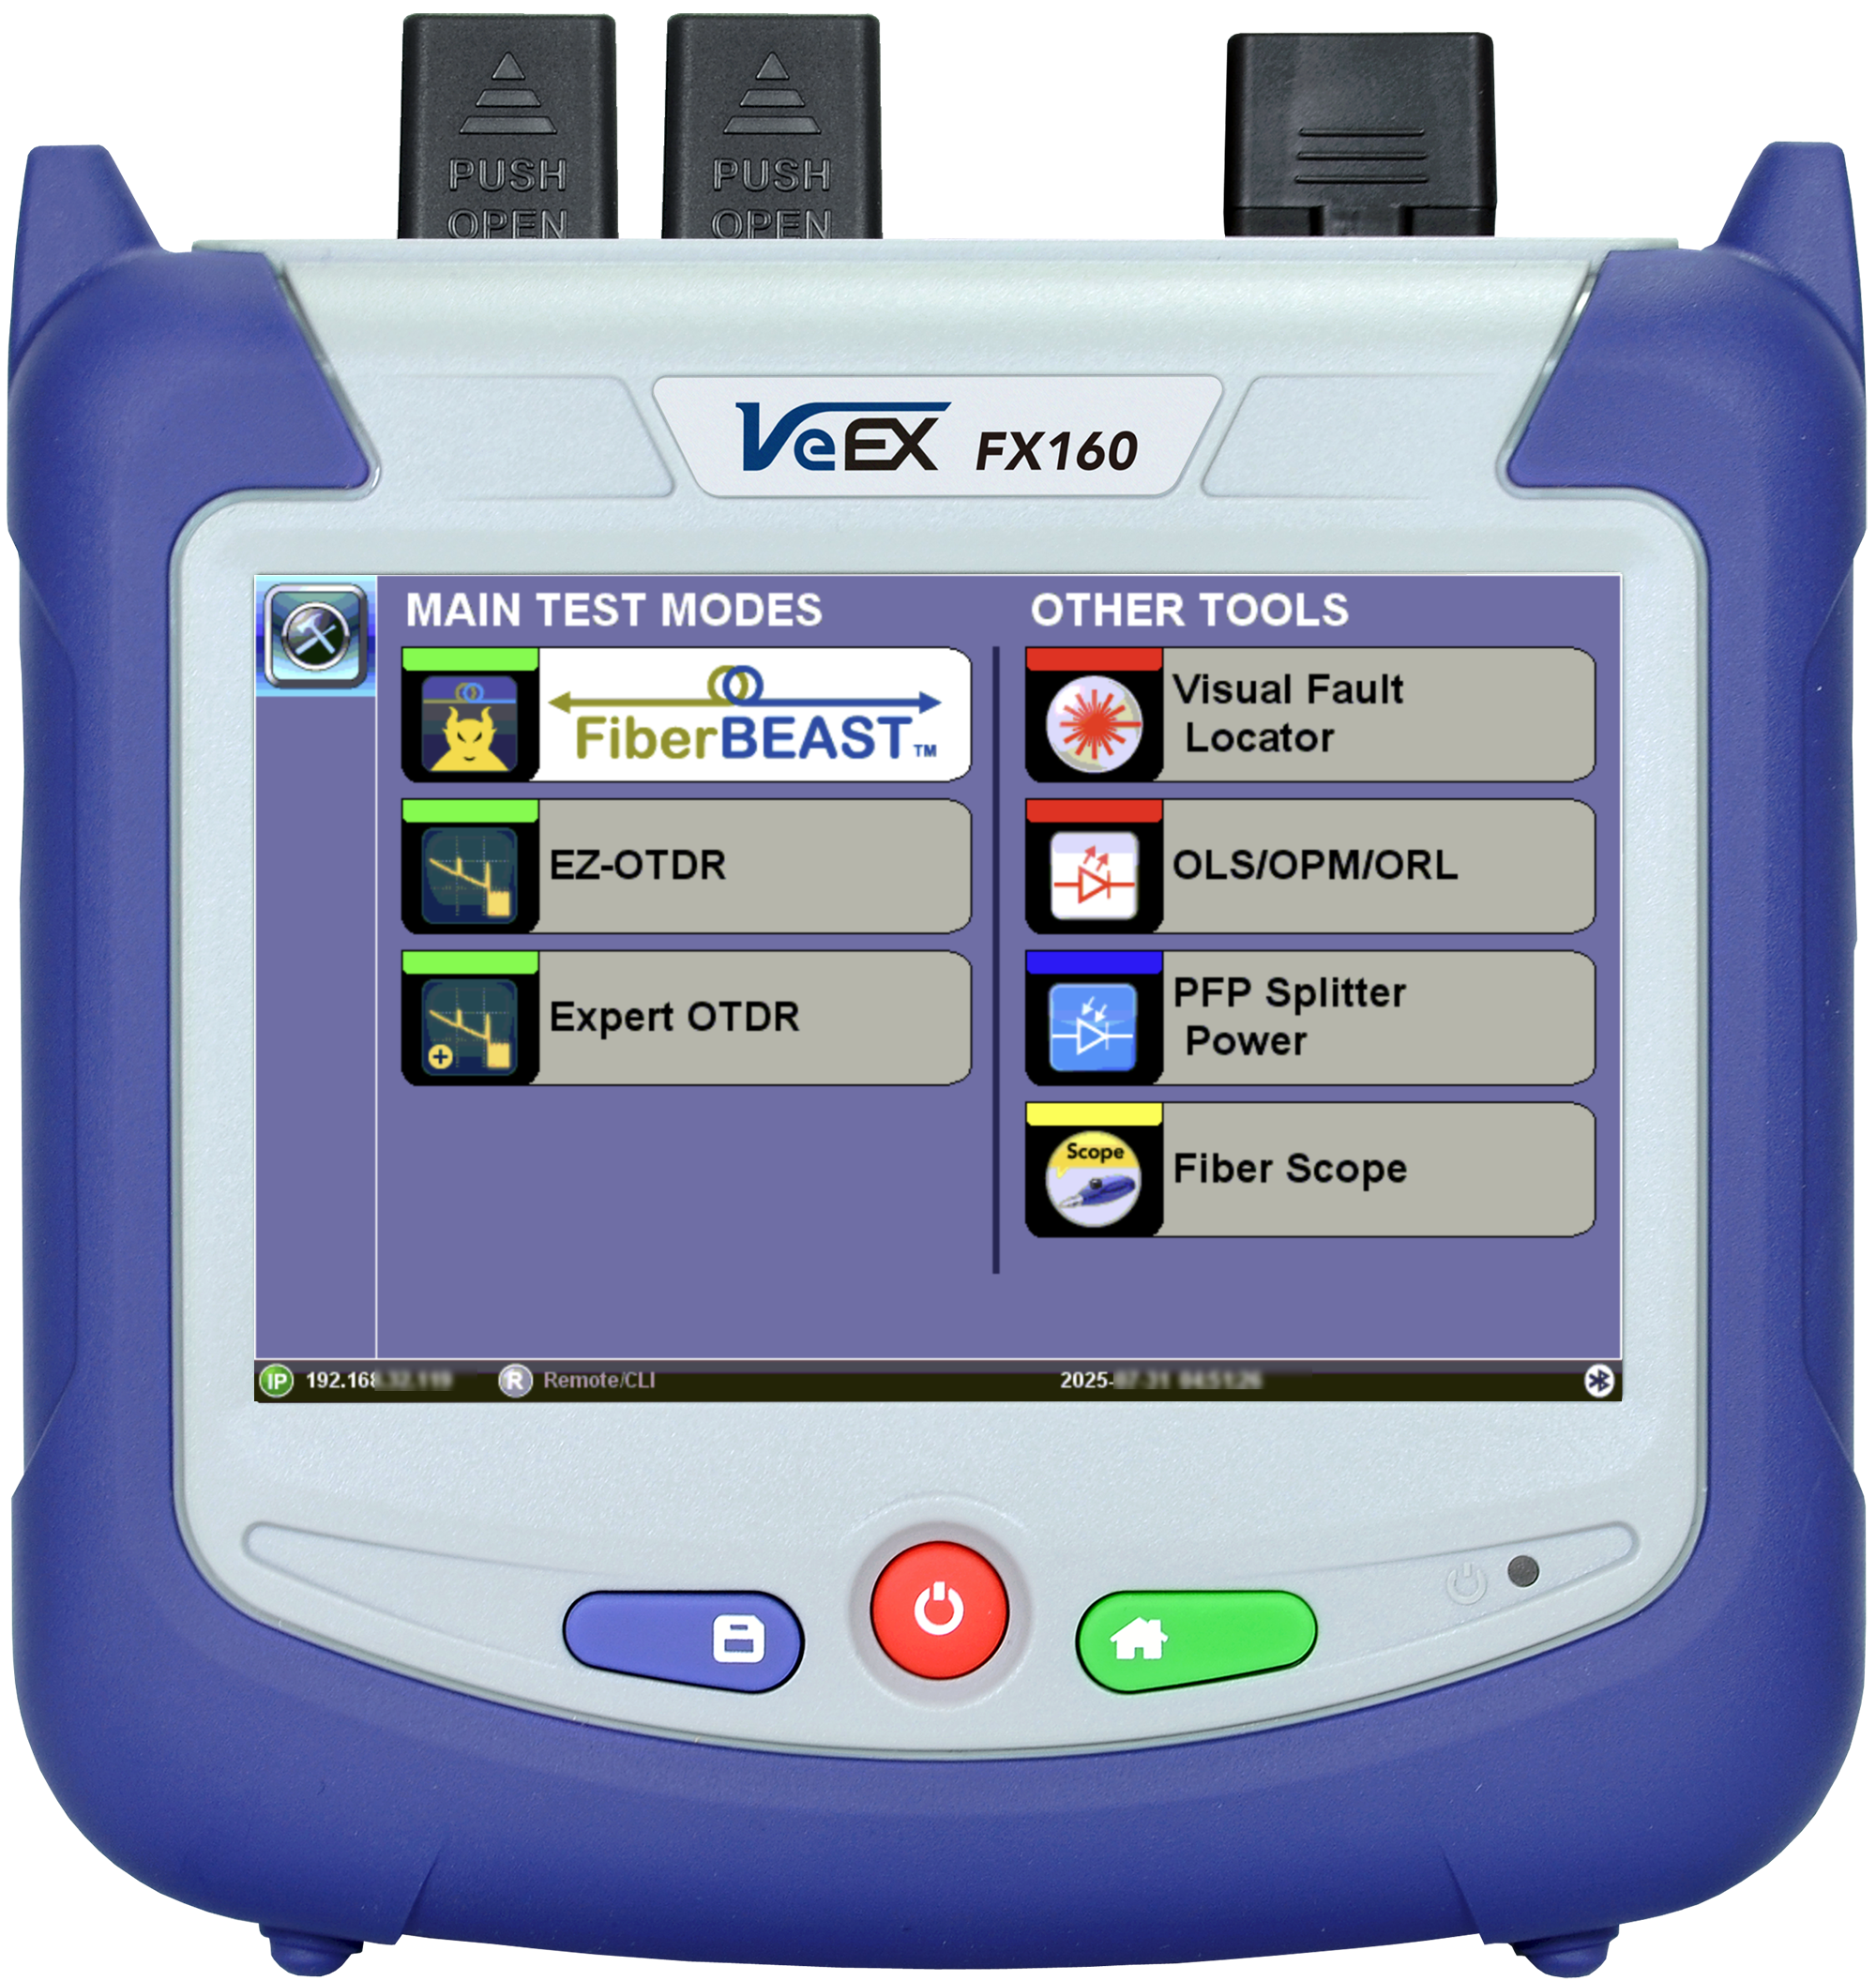
The FX160 combines bidirectional insertion loss and optical return loss (ORL) with OTDR measurement in one report with easy, automated testing. Each FX160 pair communicates using the fiber under test, allowing a single technician to perform bidirectional point-to-multipoint testing without having to return to the remote device. This compact, lightweight test set can be incorporated with power meter, light source, fiber inspection probe and VFL test options which add exceptional versatility to the unit.
The FX160's FiberBEAST™ (Bidirectional Easy Analysis by a Single Technician) test suite performs automated bidirectional insertion loss (IL), optical return loss (ORL), and unidirectional OTDR measurements for up to three wavelengths via a single test port.
Step 1: Power on Test Set
Press and hold the Power button ![]() for two seconds, until a confirmation tone (beep) is heard, and the VeEX logo appears on the screen, then release the power button. The test set will take a few seconds to boot up and automatically start the Fiber Application Tools menu.
for two seconds, until a confirmation tone (beep) is heard, and the VeEX logo appears on the screen, then release the power button. The test set will take a few seconds to boot up and automatically start the Fiber Application Tools menu.
![]() To turn the test set OFF, press and hold the Power button
To turn the test set OFF, press and hold the Power button ![]() until two confirmation tones (beeps) are heard.
until two confirmation tones (beeps) are heard.
Step 2: Zero Out Meter & Configure Test Profile
-
Configure Pass/Fail Thresholds in the FiberBEAST>P/F screen.
-
If needed, enable and configure autosave settings in the FiberBEAST>Auto Save screen.
-
Clean and inspect all fiber connectors and ports BEFORE making any connections. For more information, including video instructions on inspecting a connector end-face, go to "CLIC" - Clean to Maintain Optical Connector Quality.
-
Zero out the test meter by closing the dust caps completely over the ports and selecting Zero in the FiberBEAST>OLTS screen.
-
Perform referencing so meter(s) are calibrated to the Laser Source output. Once the referencing is done, take the test sets to their respective test sites and make the necessary connections. See Step 3.
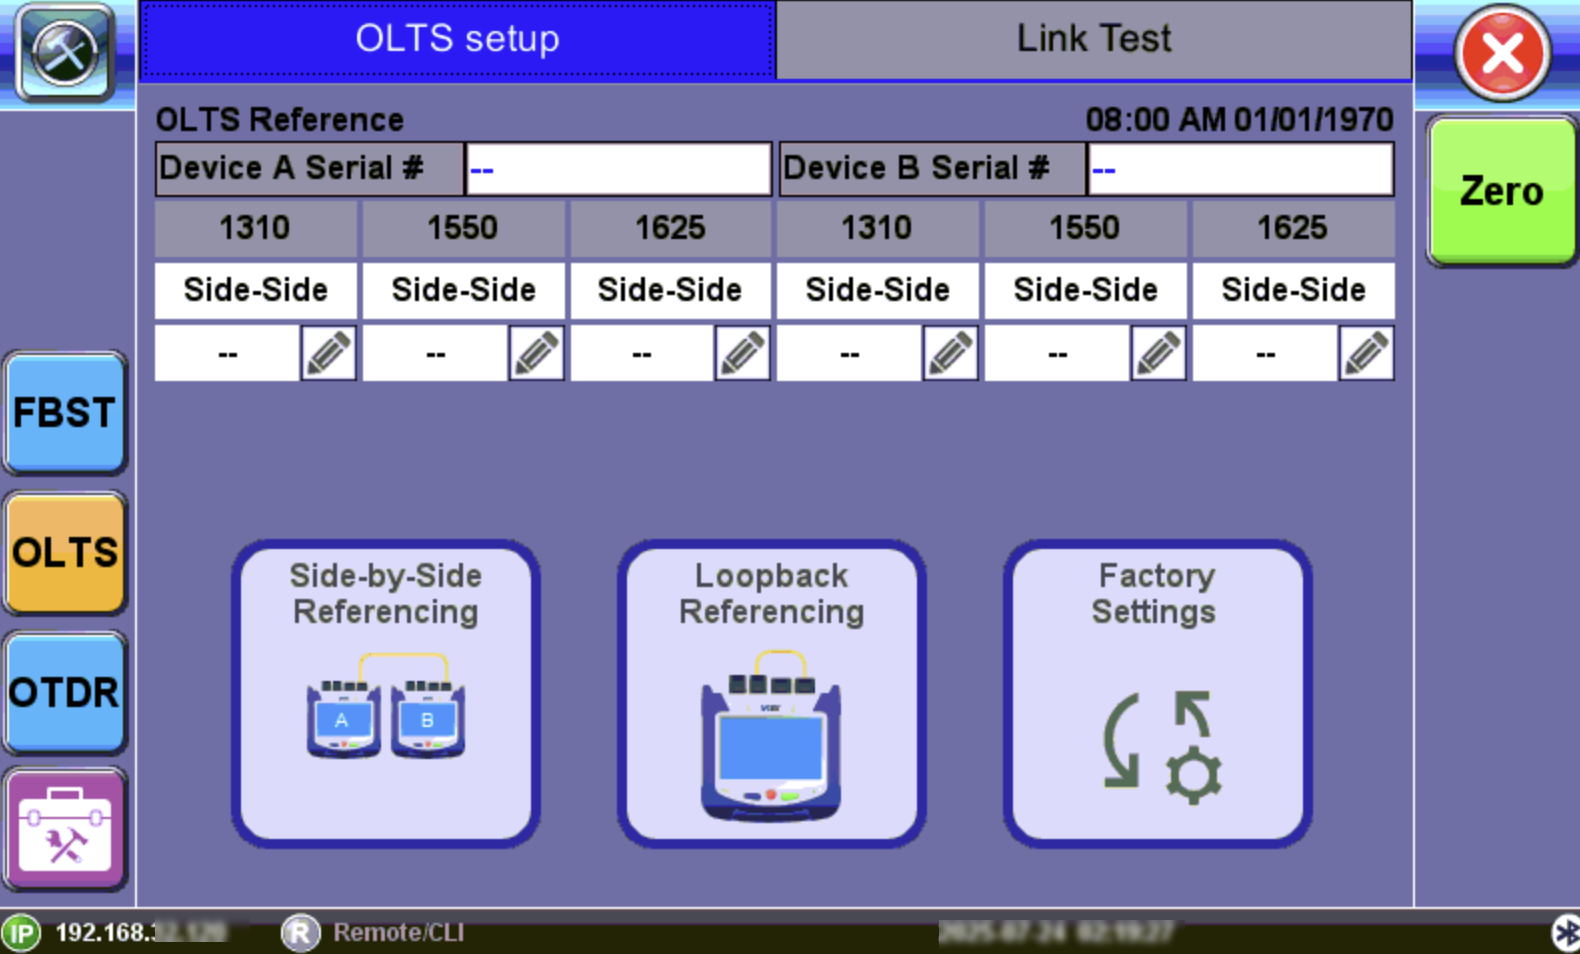
Step 3: Perform Referencing
- Clean connectors and ports, then connect the main test port of the unit at one end to the main test port of the unit at the other end using a reference patchcord.
- On both FX160 test sets:
- Select FiberBEAST.
- Select OLTS to access the OLTS/ORL application.
- On the FX160 Controller unit, select the option to perform the reference.
FiberBEAST™ Screen
-
Side-by-Side Referencing(most accurate and recommended) – Both test sets must be side-by-side at a local site. This referencing establishes a connection between test partners and measures insertion and return loss of the fiber jumpers or launch fiber. Reference values are stored and later applied to obtain true loss readings.
Use by connecting two units next to each other.Connect the OTDR ports on both test sets together, using a clean patch cord that will be used for testing. If needed, on the Remote test set, select the FBST button to place in FiberBEAST™ mode. Keep the main Controller test set in OLTS mode and select Side-by-Side Referencing. The test sets will perform insertion loss and ORL referencing automatically and store these references in the main unit for future tests. The remote unit does not require any user input or action.
-
Loopback Reference – Loopback referencing accommodates scenarios when technicians are located at different locations and it is impractical and time consuming to bring the test units together for referencing.
Use by connecting one unit back to itself. Connect a clean patch cord between the OTDR port and the OPM port on the same unit. Then, select Loopback Referencing. The unit will measure its insertion loss and ORL references for that patch cord (does not measure connector loss).The Loopback Referencing procedure must be performed on both test sets, Local and Remote, so the proper references are set on both sides.
-
Factory Settings – Uses factory reference values for the OTDR port. This option can be used when connecting directly to the fiber's pigtail AND there isn't access to the remote FX160 test set.
This setting will not account for the insertion loss or ORL of any patch cords (if used) nor does it consider changes in conditions. This will add extra variability to the measurement.
Once the referencing is done, take the test sets to their respective test sites, make the necessary connections and begin testing.
Step 4: Connect FUT and Ports
Connect the OTDR/OLTS port of the Remote test set to the desired (dark) fiber link or port under test. This is usually the site or fiber cabinet closer to the network node. For example, in the case of a PON construction verification job, the remote tester may be connected to the F1 feeder, so a field technician can then go and test all the branches at the far end (closer to the subscribers). If no AC is available at the site/cabinet, make sure the test set has a fully charged battery.
Then move to the far end of the fiber link, connect the OTDR/OLTS port of the Main test set to the fiber or port under test, and follow the procedure in Step 5.
Step 5: Run FiberBeast Test & View Results
Select the FiberBEAST option on the Fiber Main Menu, then follow the steps below.
|
|
-
On the FiberBEAST Setup menu, select the wavelengths and measurements to perform consecutively: OLTS, ORL, and/or OTDR (uni-directional only). Each test selected will be performed consecutively and results combined into one report.
-
If including OTDR in the testing, select OTDR and configure settings. Refer to Setup Screen. Select the FBST button to return to the Setup screen.
-
Select OLTS to access the ORL application, then select P/F to configure threshold settings and Autosave to enable automatic results savings. Refer to Pass/Fail Thresholds and Autosave Parameters.
-
If not already done so, open FiberBEAST on both test sets.
-
On the FX160 test set, press Start to initiate the test sequence based on test options selected. Each test selected will be performed consecutively and results combined into one report.
For bidirectional tests, the FX160 initiating the test automatically becomes the Controller and pairs with its remote test partner when connected to the fiber link under test. The FX160 Controller test set then controls communication and the test sequence with the remote FX160 test set. Serial number information and fiber reference values are exchanged before testing starts. -
After the first test is completed, a five second timer runs before the next test begins. To stop the process, press Reset. To bypass the timer, press Start OTDR.
When the tests are completed, the Results tab shows the summary of insertion loss in both directions and the average loss. A PASS or FAIL grade is shown for both the OLTS test and the 1-Way OTDR test (if performed). Refer to FiberBEAST Results.
-
Select Save/Next to save the results and proceed to the next fiber or Save to complete the job. Results are saved into one combined summary report. Refer to FiberBEAST Test Reports.
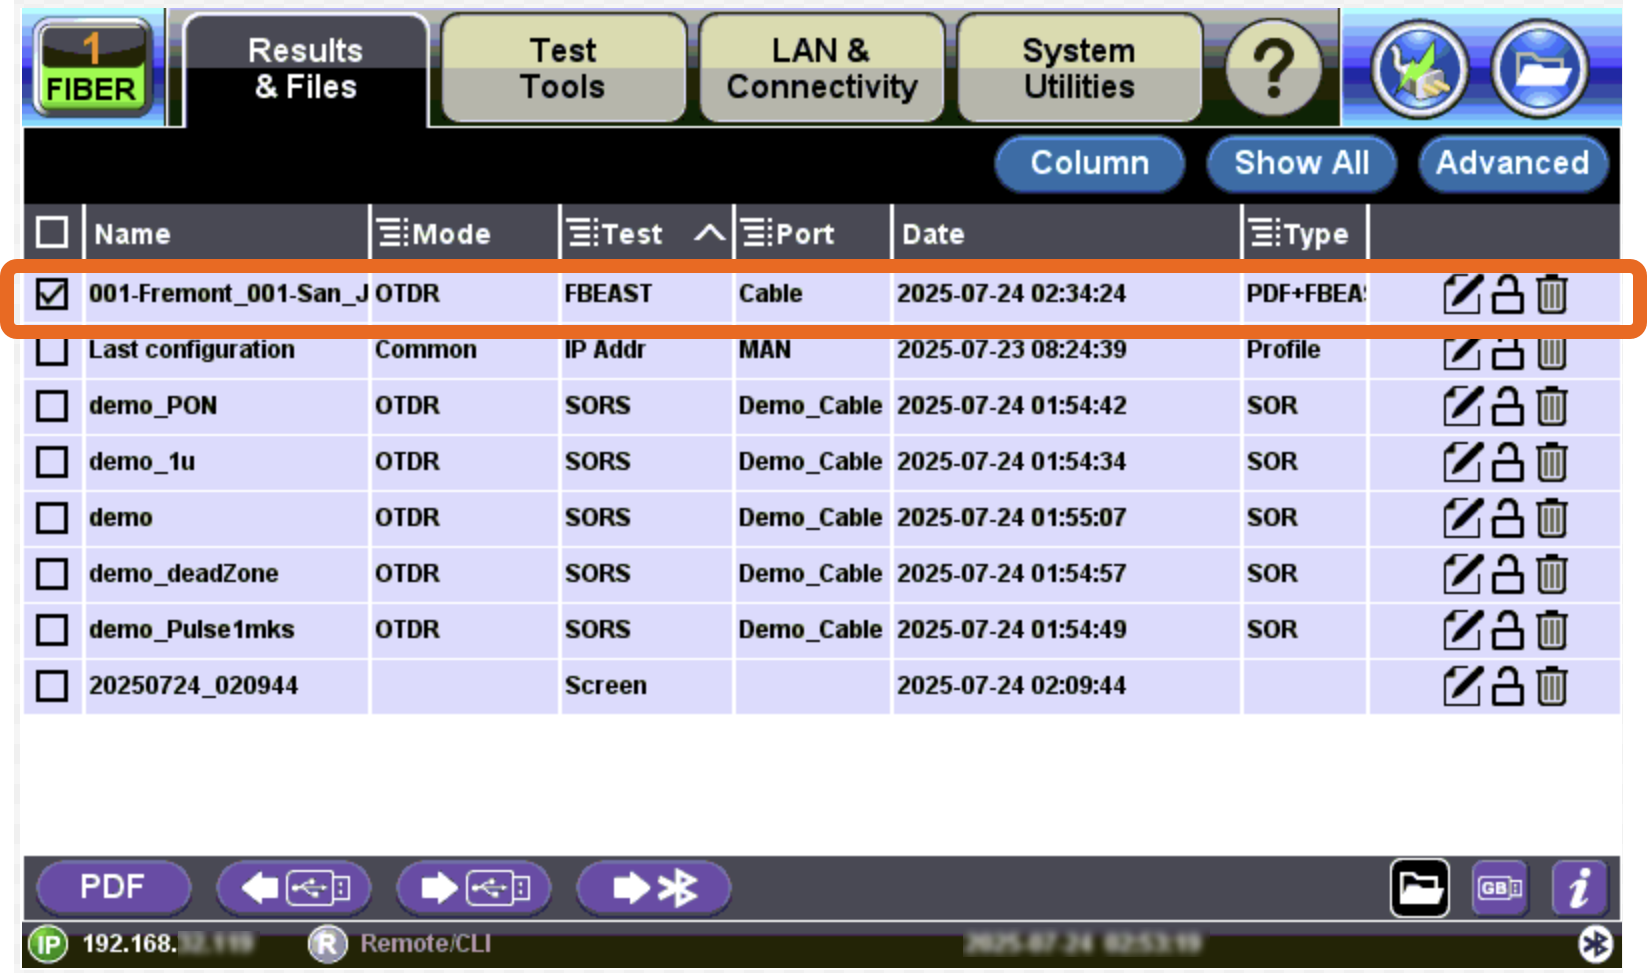
Step 6: View Certification Test Report
Test reports can be accessed from the test set's files. Refer to File Manager in the User Manual for more information on accessing the test set's files. For more information on viewing reports on mobile devices, refer to Working with Saved Results, Profiles, Images.
View Test Report from Platform Files
-
Select the System Tools and Utilities icon
 to access the platform menu.
 -
Select the Results & Files tab. The File Management screen is displayed.
-
Select the desired FBEAST results file to open the test report. Refer to Working with Saved Results, Profiles, Images more information on viewing files on the test set.
FiberBeast Results in Platform File Manager