System Features & Settings Menu
Swipe down from the top to reveal the System, Settings & Tools menu. Swipe left or right to show more options and information. Swipe up from the bottom, or tap on the Swipe-up icon  , to close.
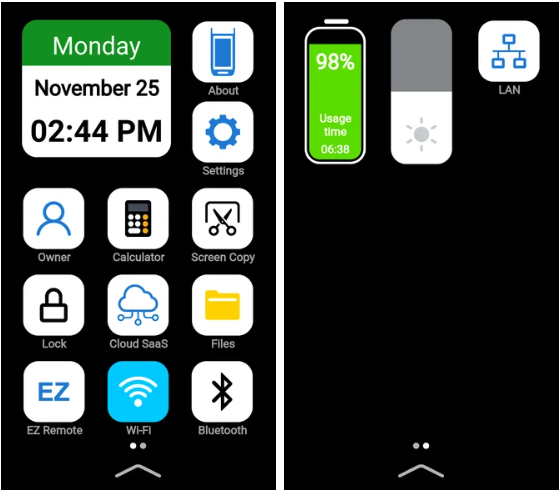
 Date & Time - Displays current date and time. Tap to adjust the system's date, time, time format, time zone, etc.
 About - Provides test set's serial number, model, software version, licenses/options and system's internal storage details.
 Global Settings - General system configuration, including language, NoApp® QR code generation, Cloud Services (R-Server), and NTP time service (if applicable).
 Owner Information - Create and access owners' profiles, with company and user contact information, to be added to test reports.
 Calculator - Calculator application.
 Screen Copy - The screenshot (screen capture) function saves the content of the screen (being displayed prior to opening the System Menu) into the File Manager, in PNG format, and organized by file type. This is similar to using the three-finger swipe down gesture. The image is stored in the File Manager with a YYYYMMDD_hhmmss naming convention.
 Screen Lock - Touch this button to LOCK the touchscreen and prevent accidental operations. When locked, the screen will be grayed out, except for an Unlock button (location of button differs). Touch and hold the UNLOCK button to UNLOCK the touchscreen.
 Cloud SaaS - Provides access to R-Server cloud services.
 File Manager - Access and manage test results, test profiles and screenshots. Files can be renamed, deleted, locked, shared, uploaded to R-Server or transferred to/from USB memory sticks.
 EZ Remote - Remote control cloud service (basic service provide free of charge). Enable/Disable remote access (Internet access required for the test set and the controlling PC, tablet or smartphone).
-
Press the Connect button to register the test set on the EZ Remote server (free cloud service) to make it available for others to use.
-
Scan the QR code, with a smartphone of tablet, to send an Email of SMS/TXT notification to your peers. A direct link will be included in the messages, along with any comments and passwords edited into them, so remote users just have to click (or manually go to https://ezremote.veexinc.net and enter the test set's Serial Number and Password).
-
See Remote Access - EZ Remote for more information.
 Wi-Fi - Turn the Wi-Fi radio OFF or ON and scan for local 802.11 b/g/n access points (AP) to stablish wireless Ethernet/IP connectivity. The test set's IP address will be displayed on the bottom-left corner of the screen.
 Bluetooth - Bluetooth transceiver ON/OFF and pairing. A small Bluetooth indicator icon is also displayed on the top bar, when Bluetooth is ON and the test set is discoverable. Initiate the pairing process from the computing device (PC/tablet/phone) and use the last four digits of the S/N as PIN.
 Battery Status - Displays current battery charge level, charging status, time to reach full charge or remaining operation time (under the current load conditions). A small power status icon is also displayed on the top bar.
-
A power LED above the screen indicates whether the test set is ON (green), OFF with charger plugged in (orange), or OFF without charger plugged (off).
-
In Low Battery condition, the test set will start beeping to warn users that it needs to be recharged. If a charger is not plugged in on time, the test set will power itself OFF.
 Brightness Control - Touch the screen (LCD) backlight button and drag it UP and DOWN to increase and decrease the backlight intensity.
 LAN - Configure the local (wired) Ethernet connection for the optional 1000BASE-T adapter (USB-C dongle).The test set's IP address will be displayed on the bottom-left corner of the screen.
 Upgrade - Copy the file ending in .tar.gz or .tar.xz to the root directory of a USB drive. Once the unit detects the image, the Upgrade icon becomes active. The system automatically identifies the newer version and upgrades to it when Upgrade is clicked.